Have you ever wondered how certain websites manage to hold your interest? Frequently, a simple yet incredibly useful tool like a chatbot makes all the difference. Chatbots do more than just respond to queries; they also improve the intelligence of your website by offering real-time assistance and retaining users.
This is essential for converting infrequent browsers into devoted patrons. Adding a chatbot to your WordPress website is simple and efficient when you use the Tidio plugin.
We are going to demonstrate to you today how to use Tidio to add a chatbot to your WordPress website. Anyone who wants to improve customer interactions without getting bogged down in technical intricacies should definitely check out this tutorial.
You may quickly get a fully functional chatbot up and running on your website by following our easy-to-follow steps. Are you prepared to begin? Let’s get started and improve the invitingness of your website for visitors!
Why Add a Chatbot to Your Website?
Adding a chatbot to your website can transform how you interact with visitors, providing a seamless blend of automation and personal touch that’s essential in today’s fast-paced digital landscape. Whether you’re running an e-commerce site, a blog, or a corporate website, a chatbot serves as your front-line communication tool, instantly engaging with users and helping to guide them through your site.
Here are a few key reasons to consider adding a chatbot to your website:
- Instant Customer Support: Chatbots are available around the clock to answer questions and resolve issues. They can handle multiple inquiries at once, ensuring that your visitors receive immediate assistance, any time of the day or night.
- Increased Engagement: By initiating conversations and responding promptly, chatbots keep users engaged. This interactive experience can significantly reduce bounce rates and keep visitors on your site longer.
- Lead Generation and Qualification: Chatbots can gather information by asking relevant questions, helping you capture and qualify leads automatically. This makes your sales funnel more efficient and ensures that your team focuses on the most promising leads.
- Cost Efficiency: Automating customer support with chatbots can reduce the workload on your human staff and cut down on operational costs. By handling routine inquiries, chatbots free up your team to tackle more complex issues.
- Personalized User Experience: Chatbots can deliver personalized experiences by recommending products, services, or content based on the user’s behavior and past interactions. This tailored approach often leads to higher satisfaction rates and increased sales.
- Scalability: As your business grows, a chatbot scales with it. You won’t need to hire more staff to manage increased traffic, as the chatbot can efficiently manage thousands of conversations simultaneously.
Integrating a chatbot into your website isn’t just about keeping up with trends; it’s about making a strategic move to improve user interaction, streamline your service, and enhance overall user satisfaction. With these benefits, a chatbot becomes an invaluable asset to any digital business strategy.
Step 1: Installing Tidio Chat Plugin
- Go to your WordPress Dashboard and click on Plugins.
- Go to Add New Plugin.
- Search for the Tidio plugin and click on Install.
- Click on Activate.
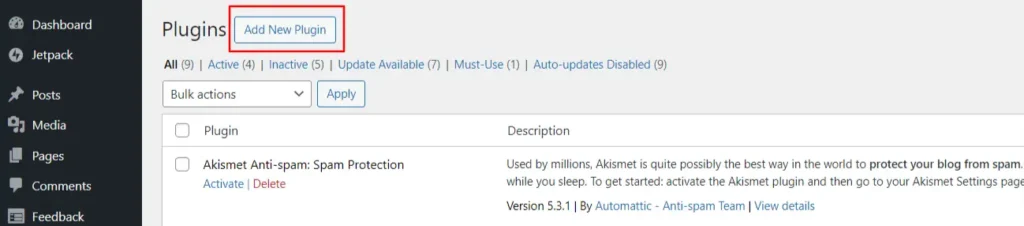
Screenshot 1: Click on Add New Plugin
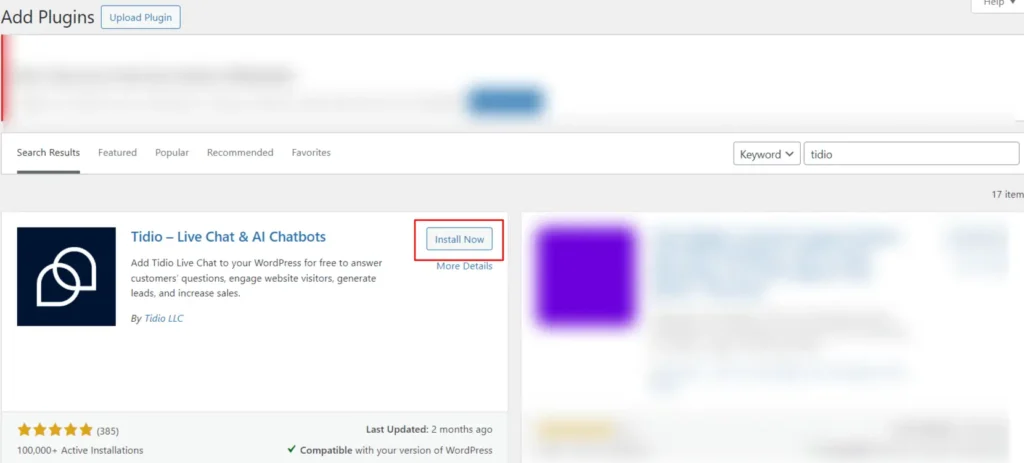
Screenshot 2: Install and Activate the Plugin
Step 2: Creating Free Tidio Account
- On activating the plugin, you can see the Tidio Chat widget on your dashboard.
- Clicking on the widget, you’ll be prompted to create an account for Tidio. They provide free trial of 7 days.
- Click on Get Started.
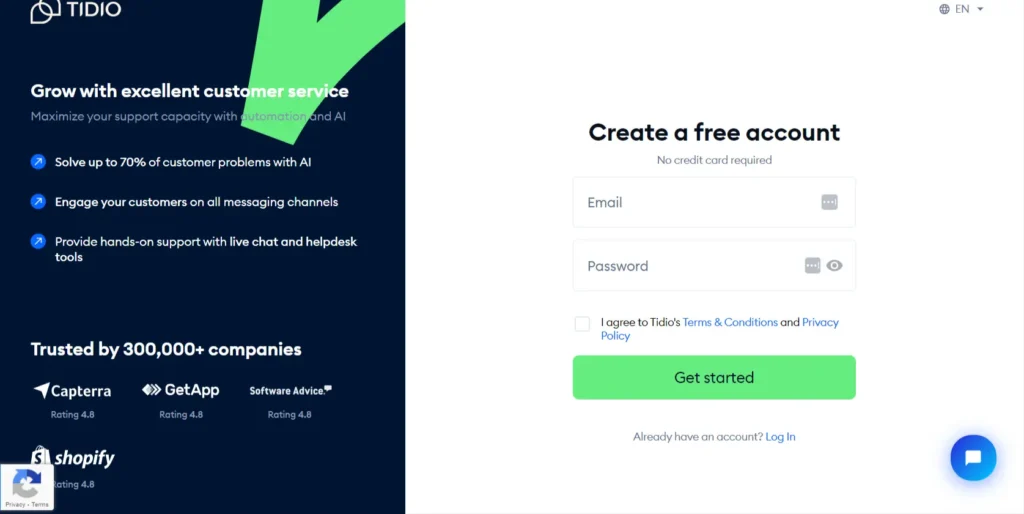
Screenshot 3: Create a Free Account
Step 3: Setting Up Tidio Plugin
- After creating the account, you’ll be redirected to Tidio’s panel to enter the required details.
- Start by entering the name and your job role.
- Select how you want to interact with the customers.
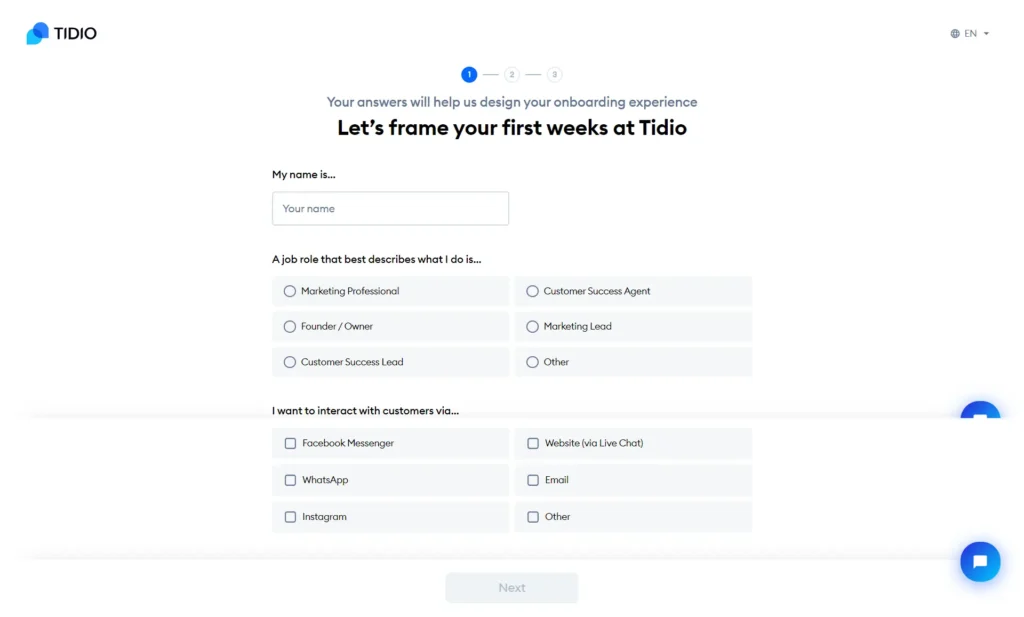
Screenshot 4: Enter Your Initial details
- Click on Next to continue to enter the details about your company.
- You are required to fill in the details about the company’s industry, size, the number of inquiries your company gets, and the platform you used to build your website.
- Select the appropriate option and click on Next.
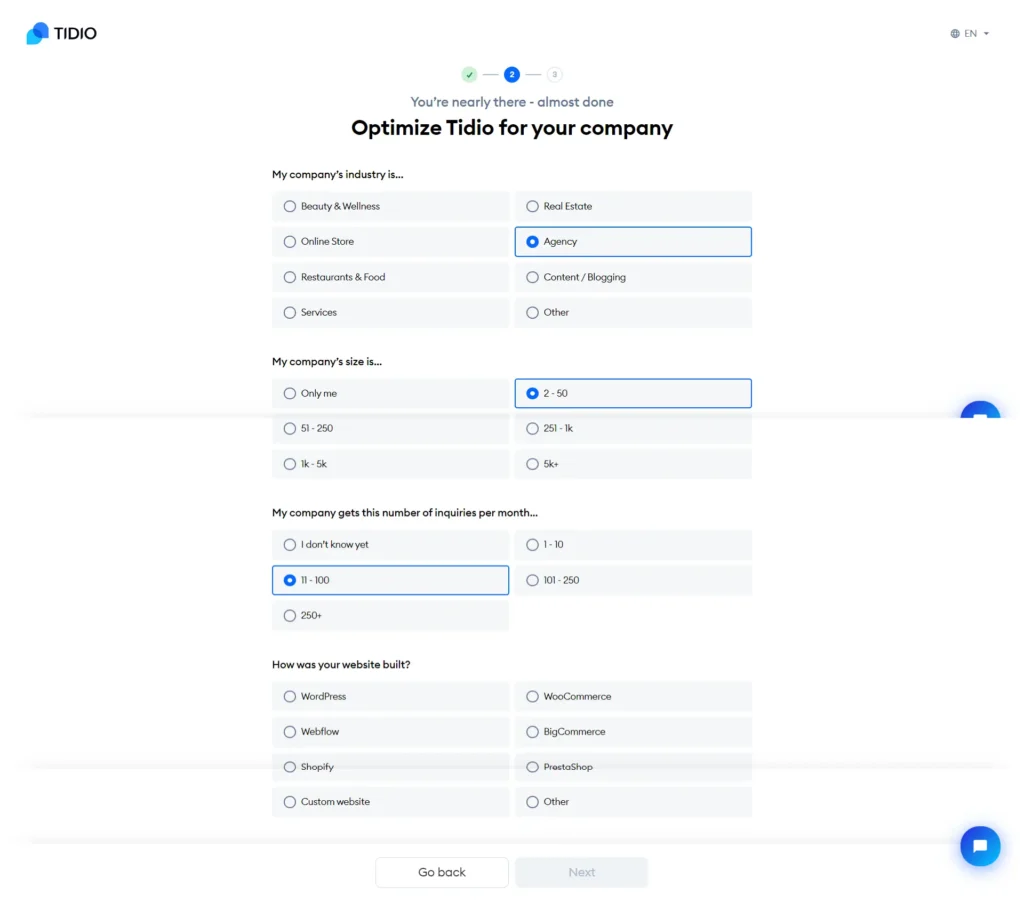
Screenshot 5: Enter Company’s Details
- Now enter general details about how you want to use Tidio, how you came to know about it, and other such details.
- Click on Start to begin.
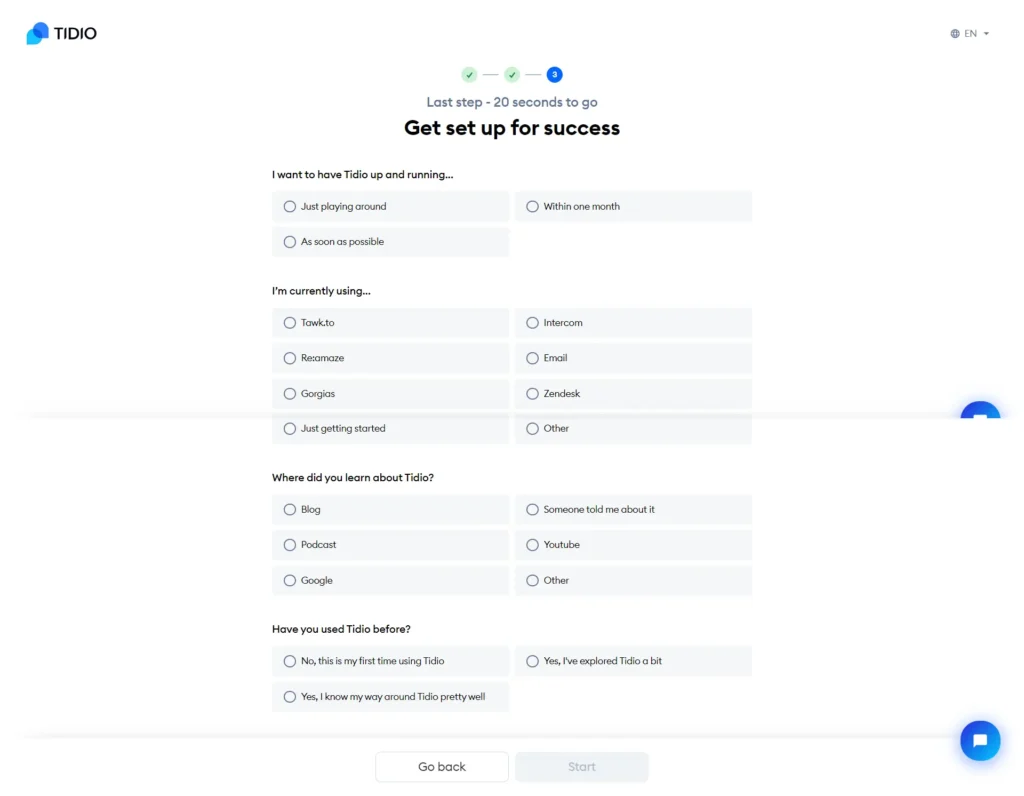
Screenshot 6: Enter Generic Details About Tidio
Step 4: Final Setup
- Tidio chat can be configured with four different ways as per your needs
- Enable Lyro – AI Support Agent
- Configure Helpdesk
- Build Flows
- Offer live support
- Talk to customers in real time. Reply to live chat, WhatsApp
- Activate the AI support for chats to minimize human intervention.
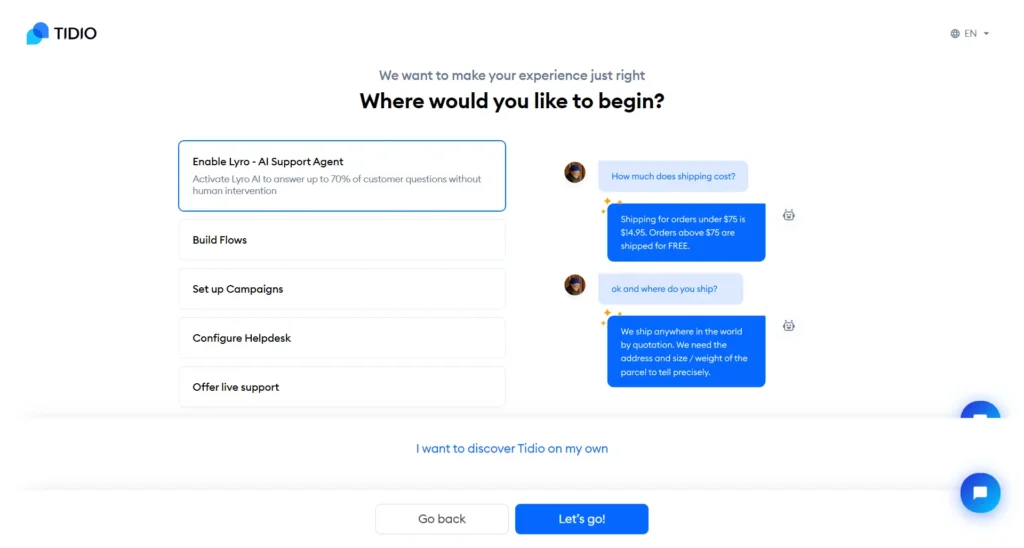
Screenshot 7: Enable AI Support Agent
- Click on Build Flows to automate conversations.
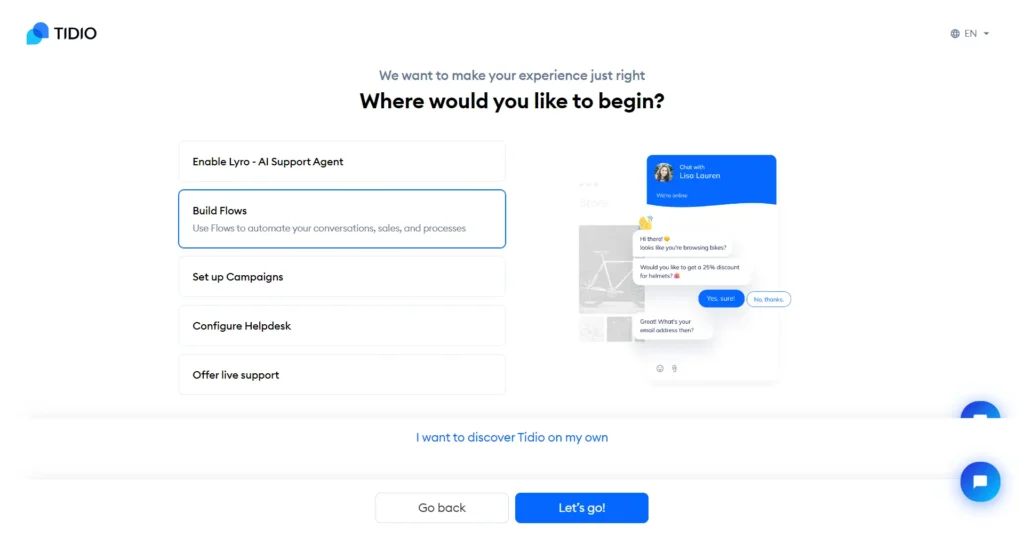
Screenshot 8: Enable Build Flows
- Click on Set up Campaigns to send custom email campaigns to your customers.
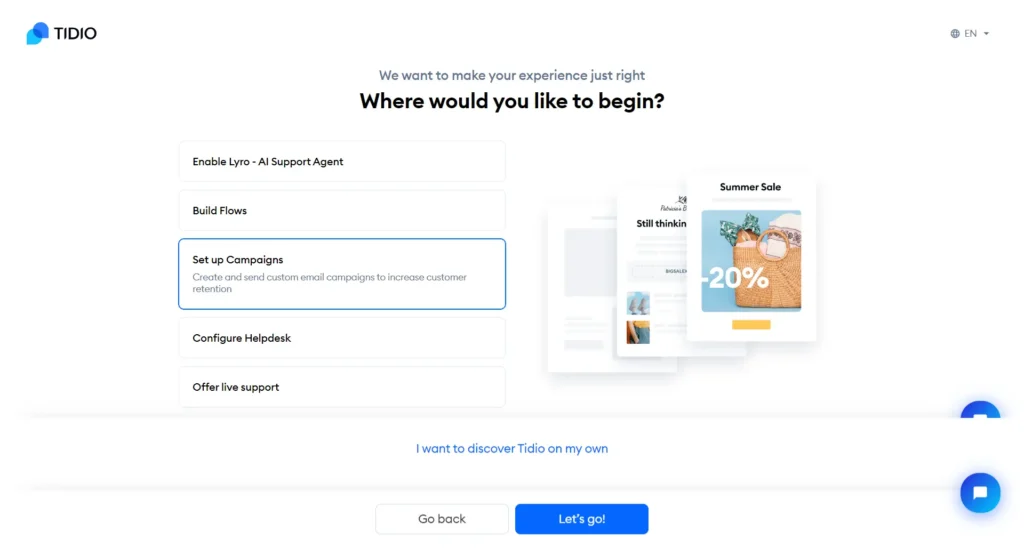
Screenshot 9: Set Up Campaigns
- Click on Configure Helpdesk to handle support tickets.

Screenshot 10: Configure Helpdesk
- Click on Offer Live Support to talk to the customers in real-time.
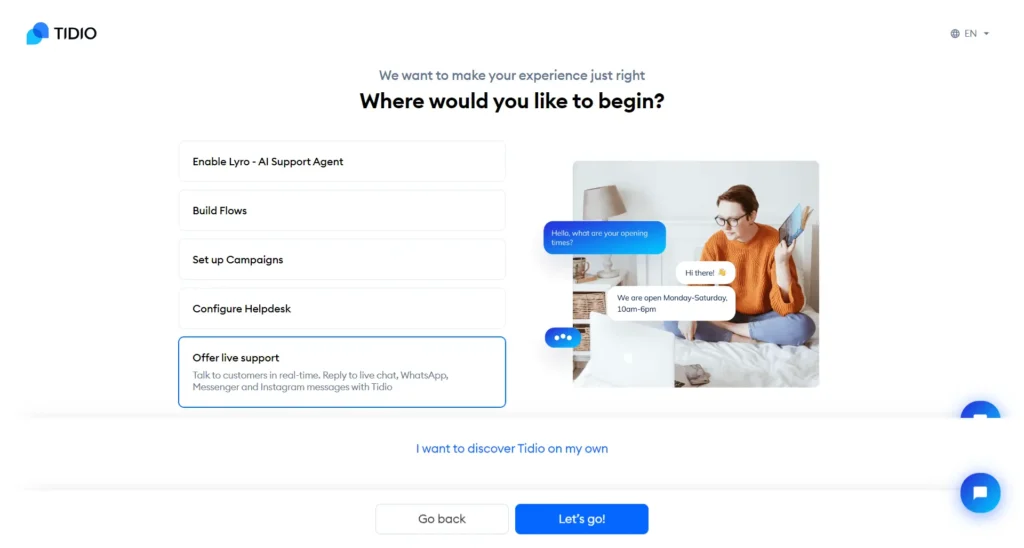
Screenshot 11: Offer Live Support
- Select the configuration you want and click on Let’s Go to start with Tidio. You will be redirected to the WordPress dashboard.
- That’s it your chat is set up easily on your website. Visit the frontend of your website
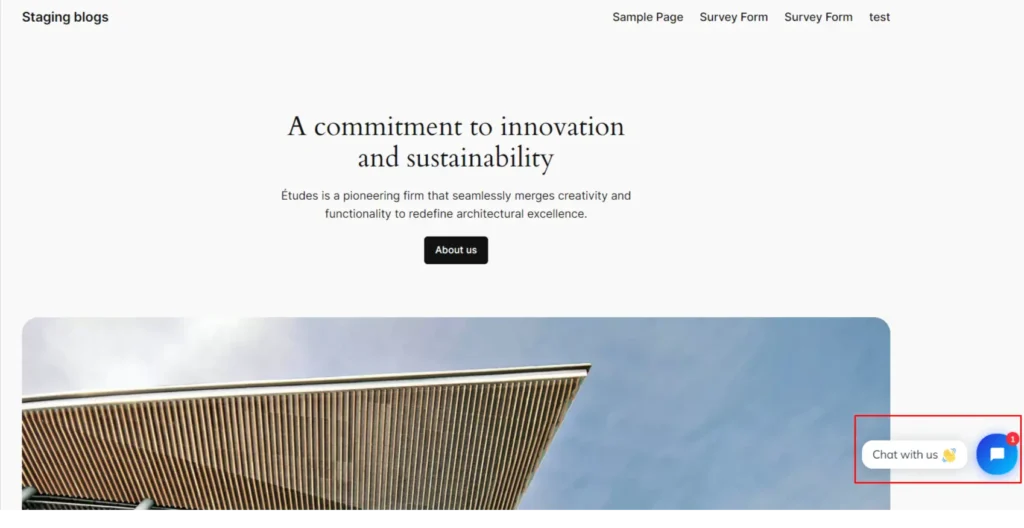
Screenshot 12: Tidio on your Website
Step 5: Advanced Configurations
- Your website Dashboard Tidio widget will show the following screen.
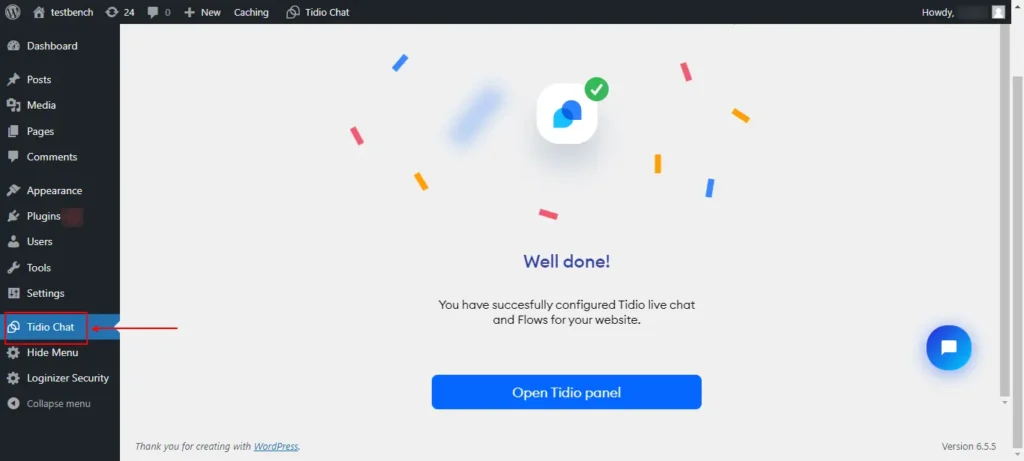
Screenshot 13: Tidio Panel
- Click on the Open Tidio Panel for advanced configurations.
- You’ll be redirected to the Tidio Dashboard.
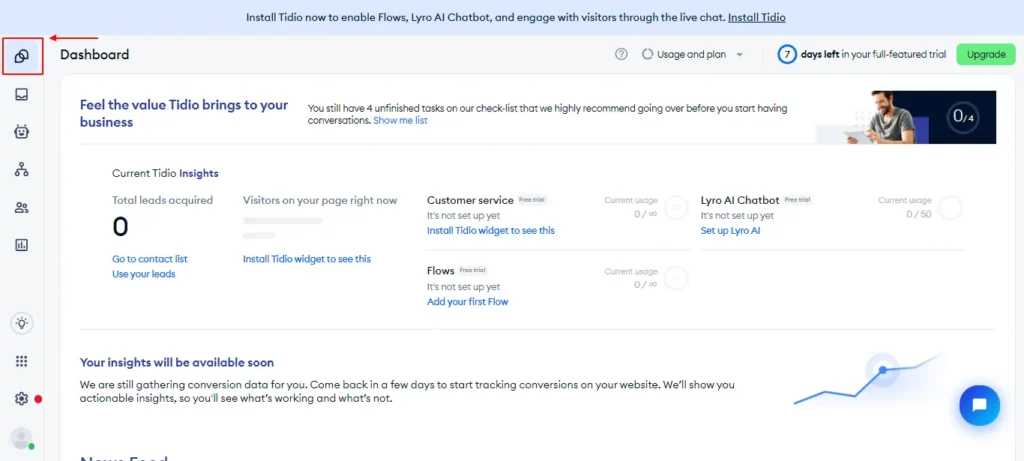
Screenshot 14: Tidio Dashboard
- This dashboard gives you all the insights about your chats.
- Total leads acquired, live visitors on page, customer services, number of flows etc.
Inbox
- Go to Inbox to get insights about chats. You can get details about your live conversations, support tickets, and views on social media.
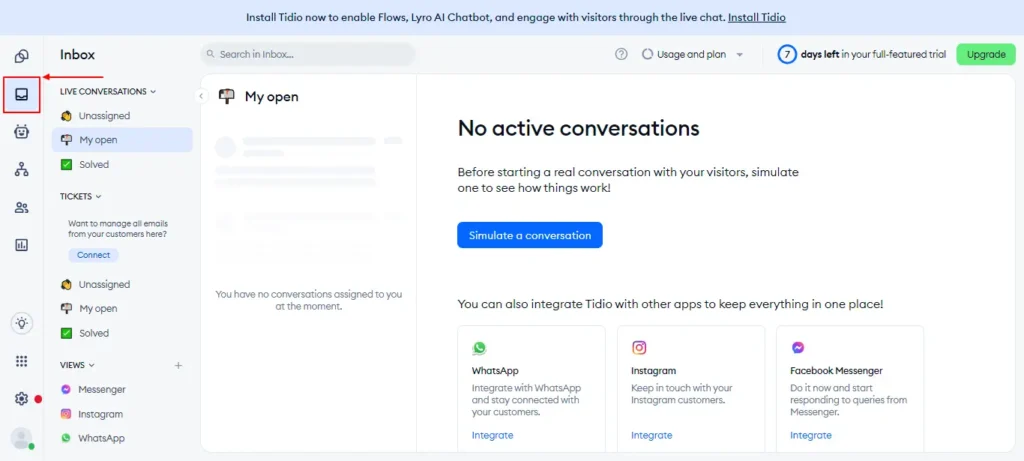
Screenshot 15: Tidio Inbox
Lyro AI Chatbot
- Configure Lyro AI Chatbot by providing URL of your website. Go to Knowledge hub to setup.
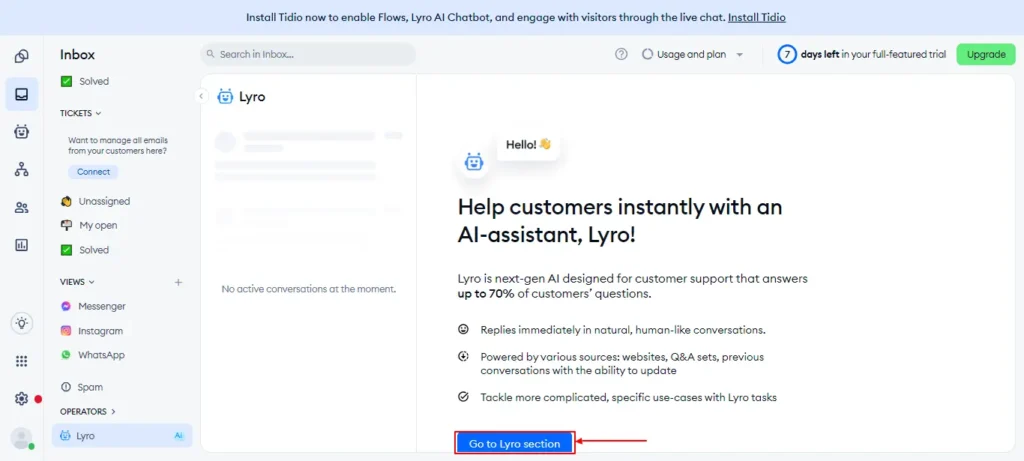
Screenshot 16: Go to Lyro section
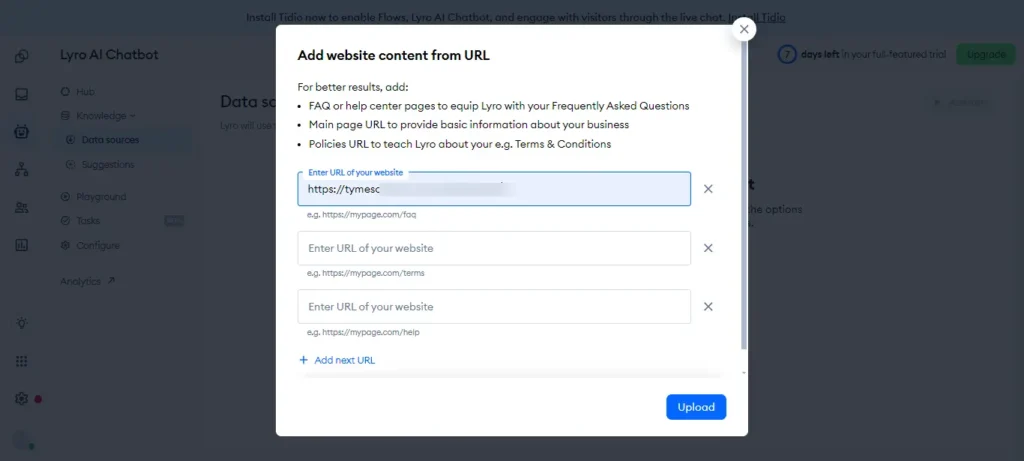
Screenshot 17: Configure Lyro Chatbot
- You can add questions and answers manually to train the chatbot.
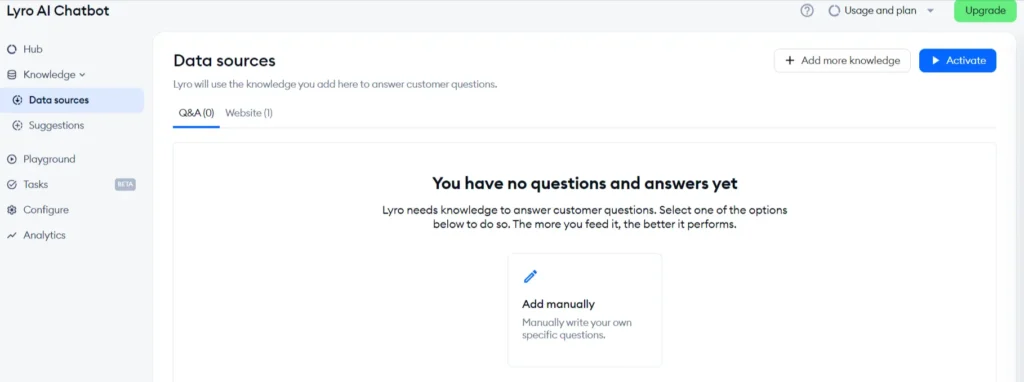
Screenshot 18: Add Q&A
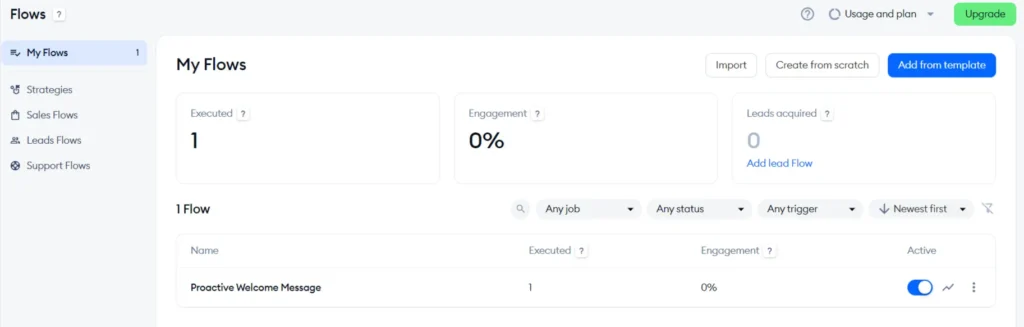
Flows
- Add flows for easy automated conversations.
- Flows are pre-designed, automated messages that engage your audience at the right time.
- It provides three templates
- Handle missed conversations: It helps you collect emails and build an e-mail list so that you can reach out later and
- Keep in touch on weekends: This helps improve customer support experience on Saturdays and Sundays when you’re offline.
- Leaving the page: Decrease your bounce rate. Message every visitor who leaves your website.
Screenshot 19: Add Flows
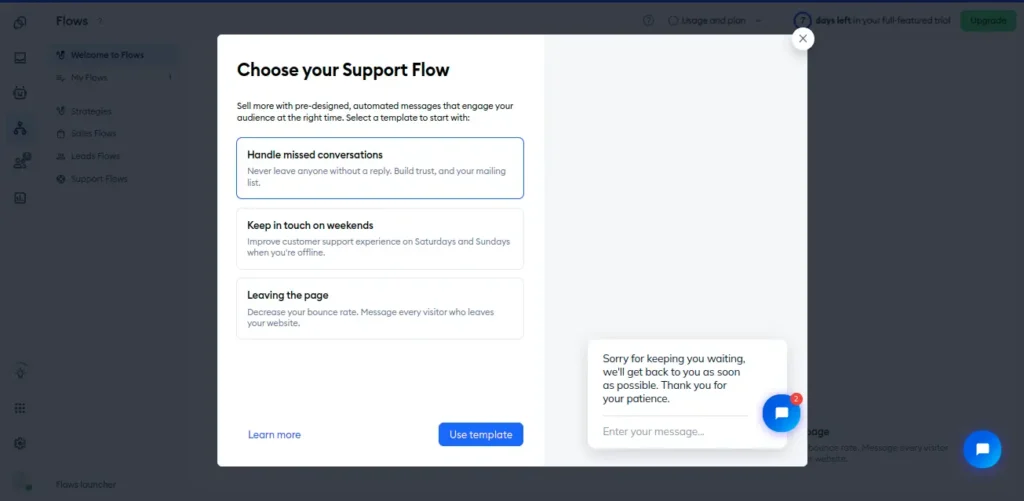
Screenshot 20: Choose your Support Flow
Customers
- Click on the “Customer” icon on the left menu to see all your live visitors.
- As you can see in the below screenshot, all the live visitors.
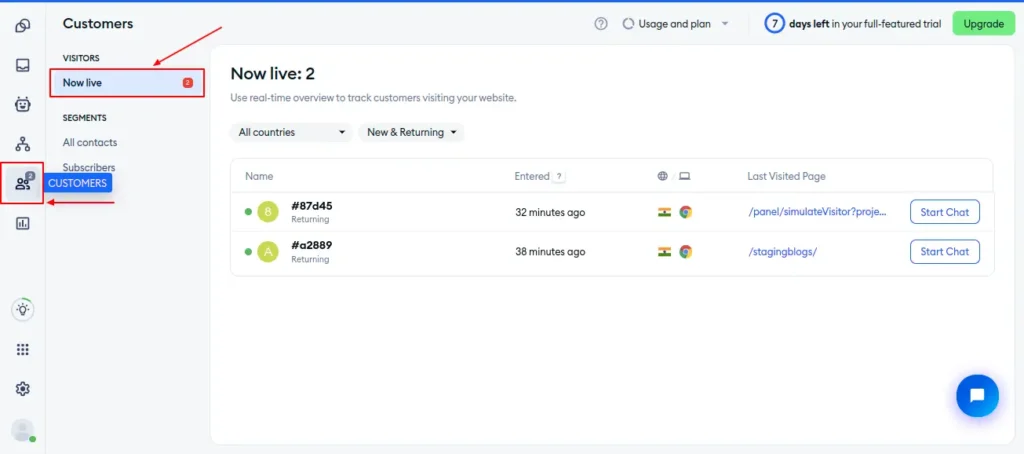
Screenshot 21: Customers (Now live)
Set up operating hours
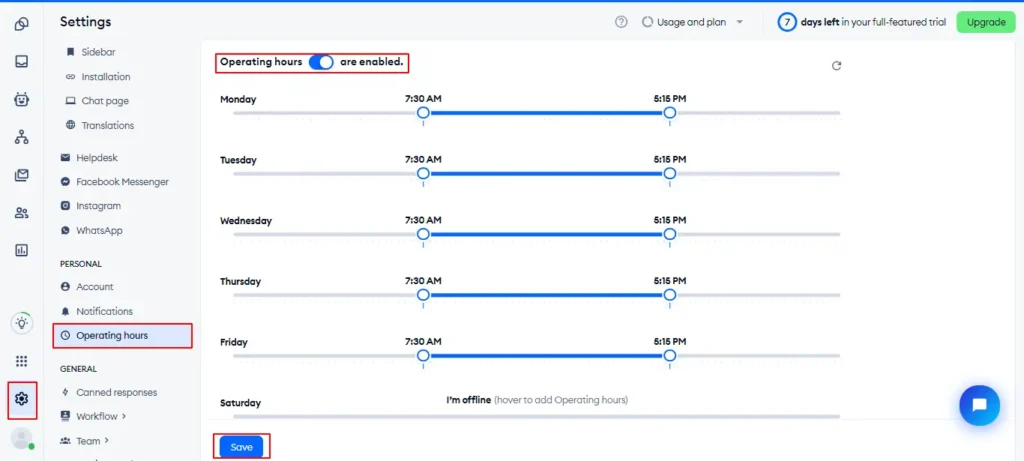
- Go to the Settings tab on the left
- Click on the Operating Hours tab
- Toggle the switch to enable operating hours. Configure it as per your requirements.
Screenshot 22: Set up operating hours
Everything you need is now set up, and your Tidio Chat is ready to use!
Conclusion
And there you have it! Adding a chatbot to your WordPress site using the Tidio plugin is not just a smart move—it’s a game changer for enhancing user interaction and streamlining customer service. With the detailed steps provided in this guide, you’re well on your way to providing a more engaging and responsive experience for every visitor.
Whether you’re looking to boost sales, improve customer support, or simply make your site more dynamic, a chatbot is a versatile tool that brings numerous benefits. So why wait? Dive into the world of automated customer interactions and see the difference it makes.
Build
Website
Themes