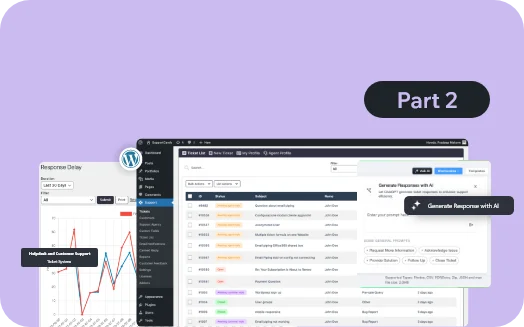
Introduction
In Part 1 of this 3 part Blog series, we covered the basics of setting up the Support Candy plugin, focusing on the following sections of the plugin
- Installation and Setting up the Plugin
- Tickets
- Customers
- Support Agents
- Custom fields
Now, in Part 2 of this Blog, we will explore the following sections of the SupportCandy.
- Ticket List
- Agent Ticket List
- Customer Ticket List
- Email notification
Ticket List
- Ticket List section is used to define the columns that appear in the Admin and Agent dashboard under Tickets → Ticket List screen and Customer Tickets list on the front end.
- You can add new columns from the existing list of items or rearrange the columns order in which they are displayed.
Step 1: Agent Ticket List
List Items tab
- Go to the SupportCandy plugin menu.
- Click on the Ticket List → Agent ticket list → List items
- Customize the column order displayed in the ticket list.
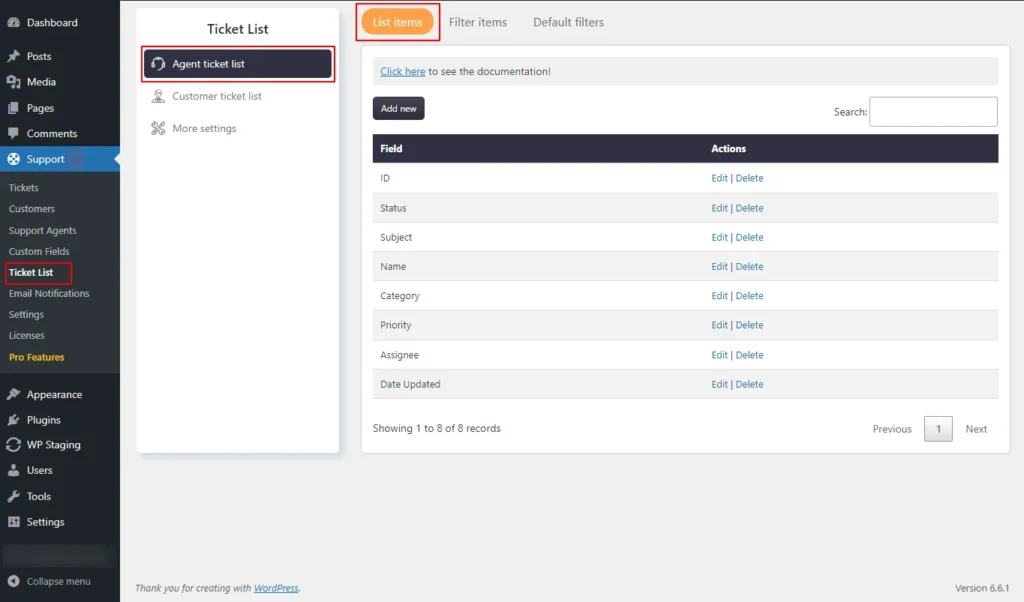
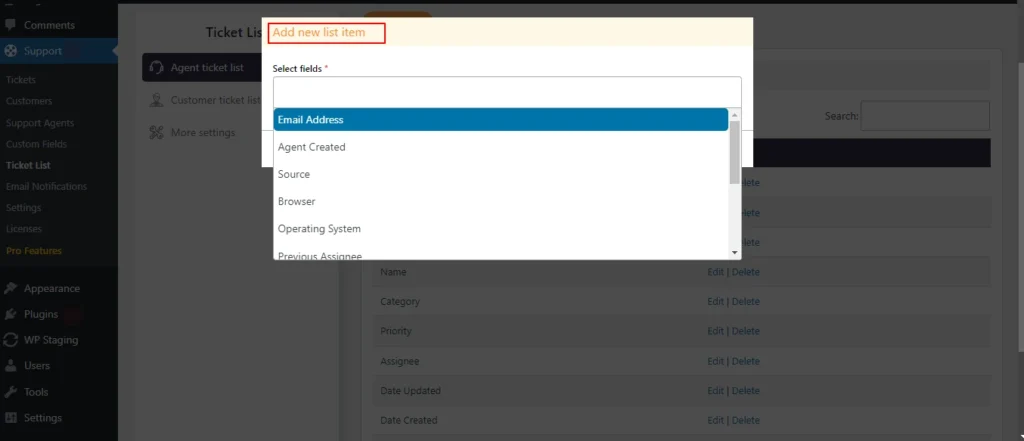
Screenshot 1: Item Lists
Adding List Items (Coulmns) to Tickelt list table
- Click on Add new to Add new List items.
- Select fields from the available list (e.g. date created, email address, etc) as shown in the below screenshot.
- Hit Submit to save changes.

Screenshot 2: Adding New Column to Agent Ticket List table
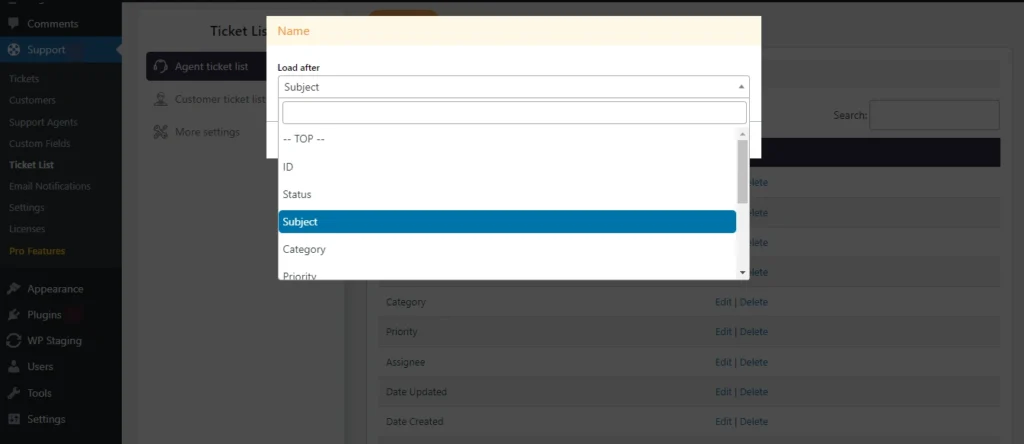
Editing List Items
- In the Agent Ticket List section, edit the column that you want to reorder.
- Click Submit to apply your changes.
Screenshot 3: Edit List Items (reordering columns)
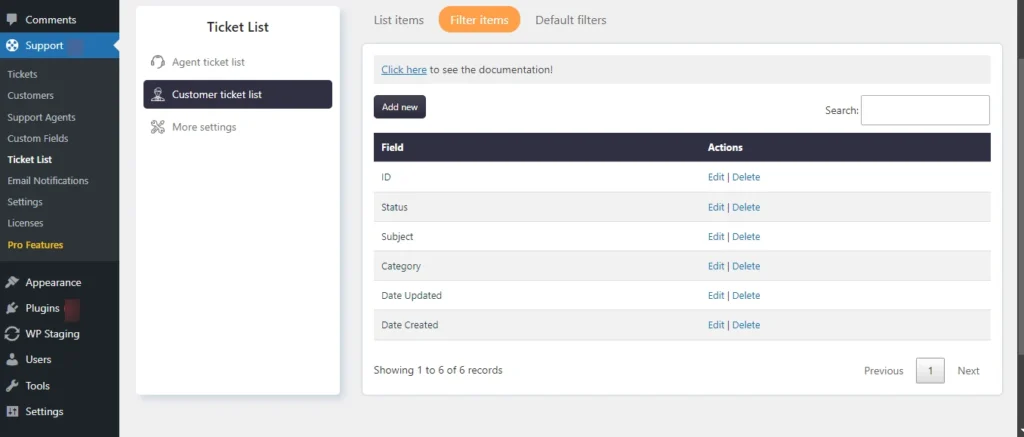
Filter Items
- This screen allows us to add filter options for filtering tickets on the Agent Tickets list screen. You filter tickets based on their status, customer, subject, category, priority, and so on.
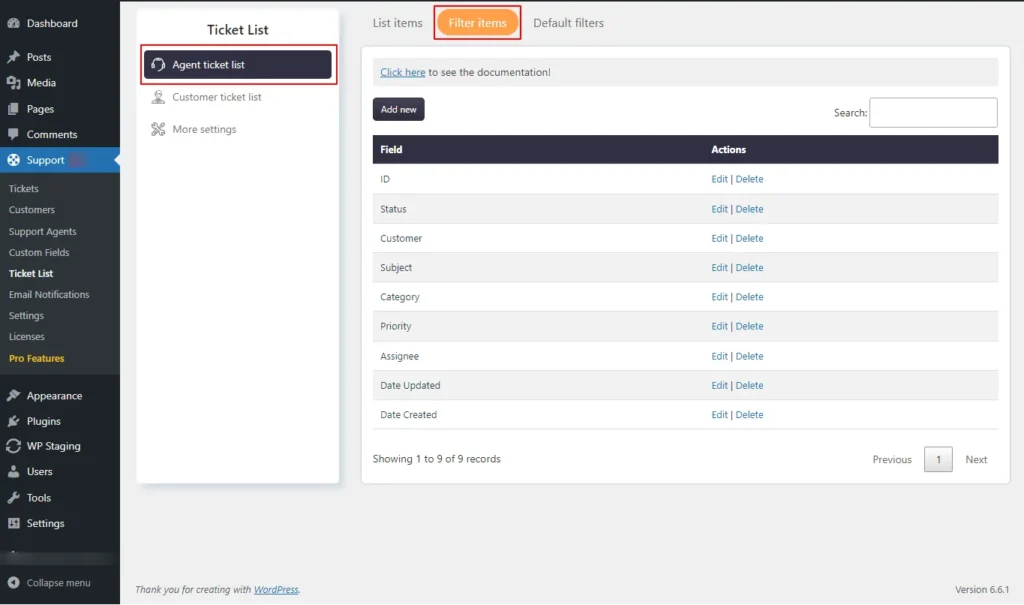
Screenshot 4: List of available filters in the Agent Ticket List
Add New Agent Tickets Filter Items
- Go to the Ticket List → Agent ticket list → Filter items.
- Add the filter options you want to filter tickets by, as shown in the screenshot below.
- Click Submit to apply the filter settings.
Screenshot 5: Add New filter options to Agents Tickets
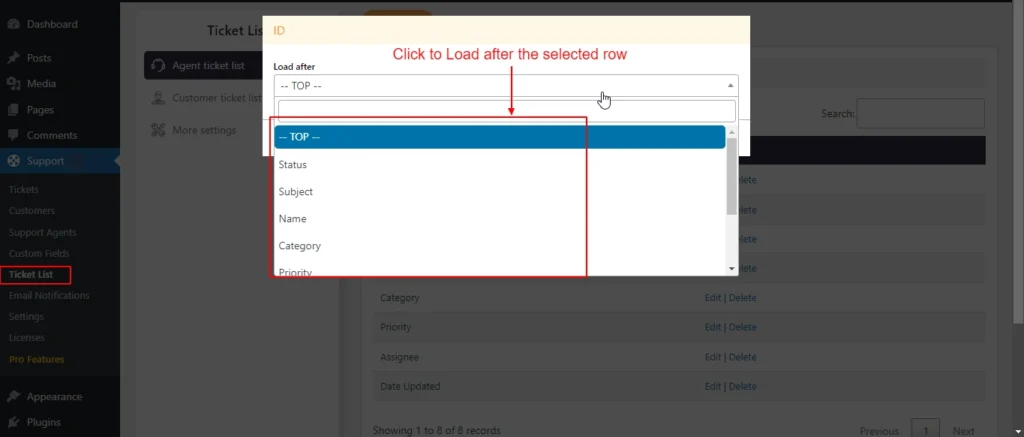
Edit Agent tickets Filter Items
- Go to the Ticket List → Agent ticket list → Filter items. Click the Edit link beside the field.
- You can only change the Load after setting
- Click Submit to apply your changes.
Screenshot 6: Edit filter item for Agents Tickets
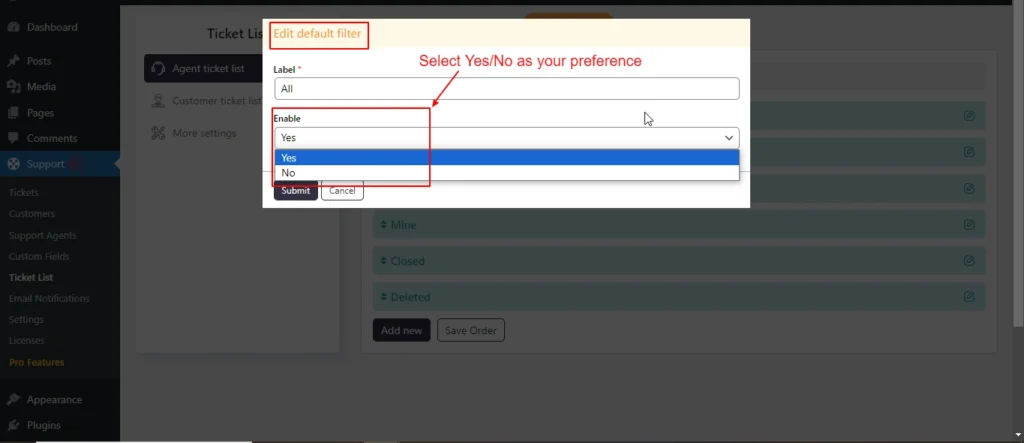
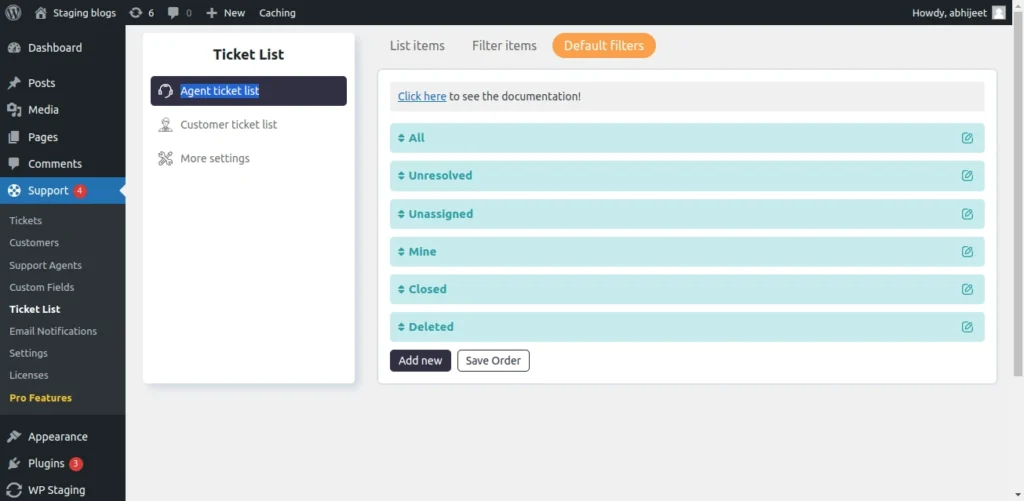
Default Filters
- Default filters are filters on the ticket list. Here we choose the fields created in the above steps. These filters are available to agents.
- Select the items for default filters drop down on the Ticket List page (e.g., All, Unresolved, Unassigned, Mine, Closed, Deleted, show only open tickets).
- Drag and drop to reorder the fields as needed.
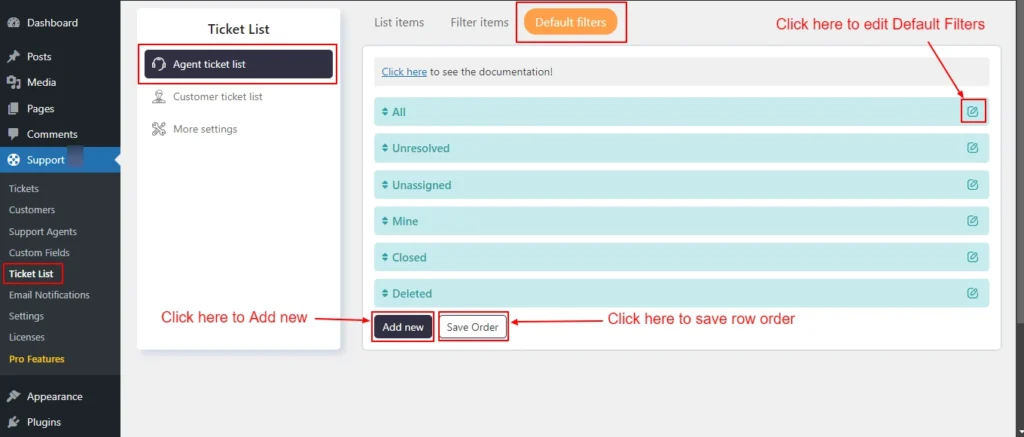
Screenshot 7: Agent Ticket List Default filters
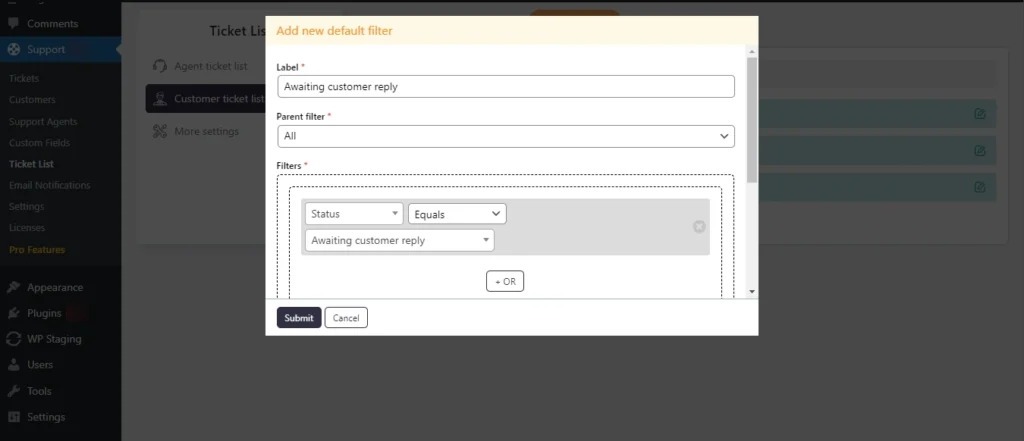
Add new Agent ticket list Default Filters
- Go to Ticket List → Agent ticket list → Default filters
- Enter the Label, choose the Parent filter if needed
- If required apply conditional logic.
- Set the Enable drop-down to Yes
- Click Submit.
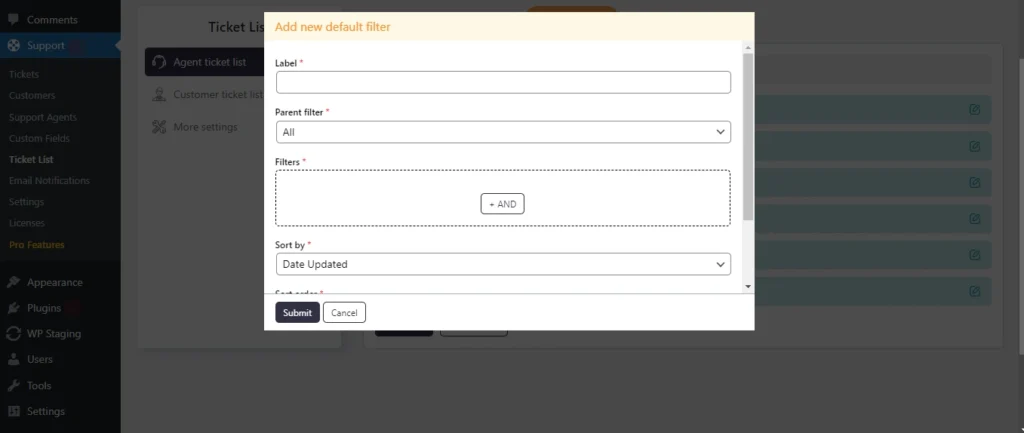
Screenshot 8: Add new Default filter
Edit Agent tickets Default Filter
- Go to Ticket List > Agent ticket list > Default filters
- Click on the edit icon beside the filter name
- You can only edit the Label and its Enable status.
Screenshot 9: Edit Default filters
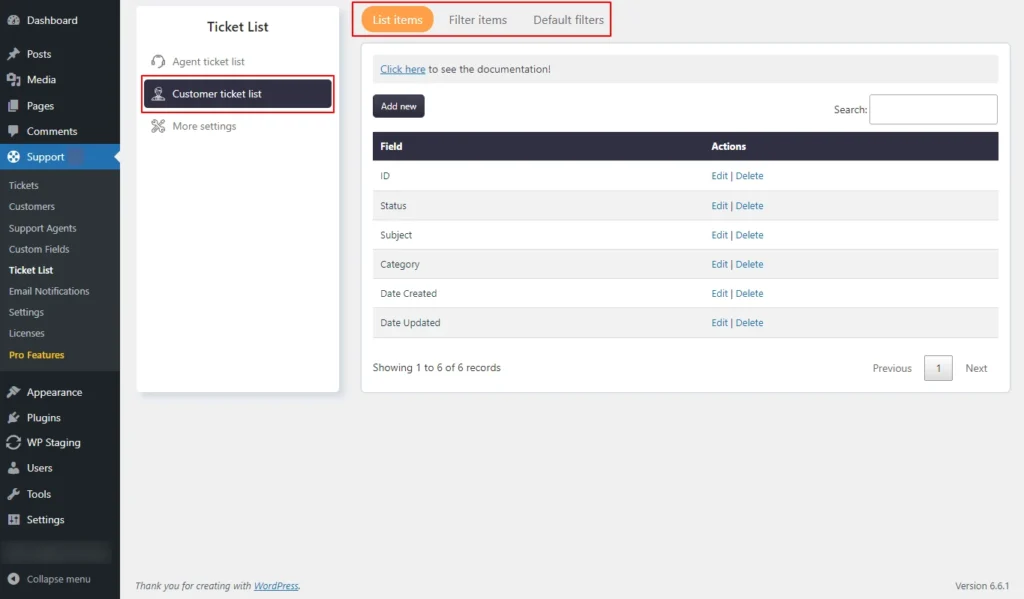
Step 2: Customer Ticket List
- Similar to Agent ticket list we can define columns for the Customer ticket list and add new filters to it.
Screenshot 10: Columns displayed in the Customer ticket list
List Items
- Go to the SupportCandy plugin menu.
- Click on the Ticket List → Customer ticket list → List items
- Customize the column order displayed in the ticket list.
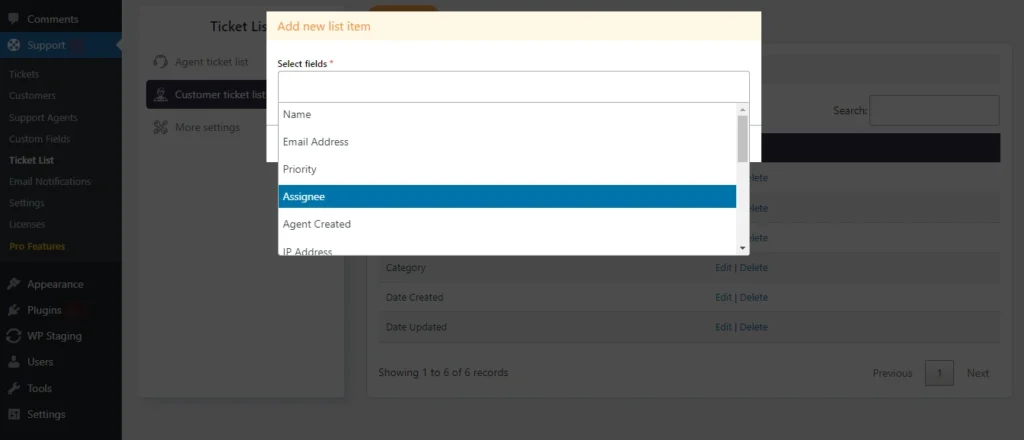
Adding List Items (Coulmns to Tickelt List Table)
- Click on Add new
- Select fields from the available dropdown (eg. Name, email address, priority, etc.) as shown in the below screenshot.
- Hit Submit to save changes.
Screenshot 11: Custom ticket list → Add new list item
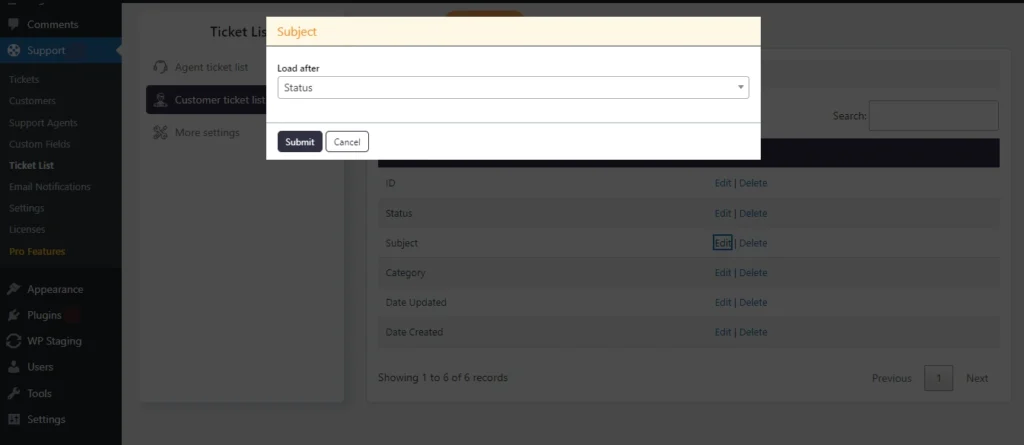
Editing List Items
- In the Customer Ticket List section, edit the column that you want to reorder.
- Click Submit to apply your changes.
Screenshot 12: Customer ticket list → Edit list item
Filter Items
- This screen allows us to add filter options for filtering tickets on the Agent Tickets list screen. You filter tickets based on it’s status, customer, subject, category, priority, and so on.
Screenshot 13: Filter fields for Customer tickets (frontend)
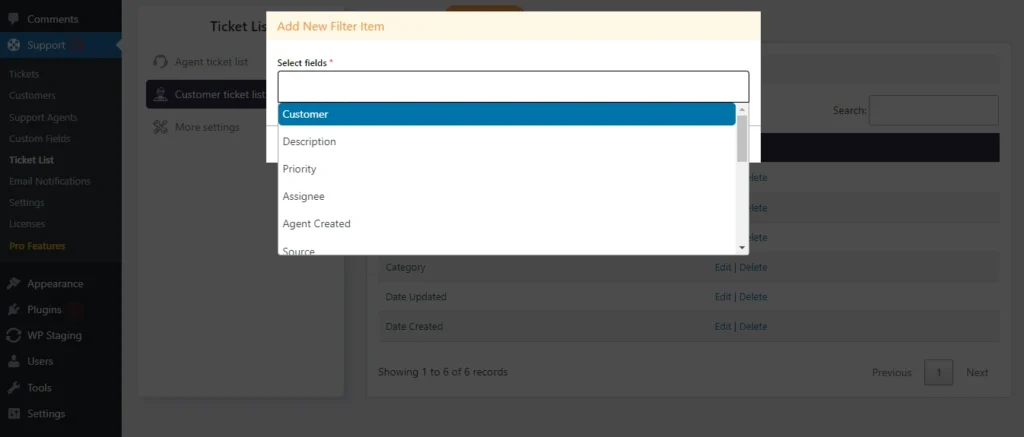
Add New Customer Tickets Filter Items
- Go to the Ticket List → Customer ticket list → Filter items.
- Add the filter options you want to filter tickets by, as shown in the screenshot below.
- Click Submit to apply the filter settings.
Screenshot 14: Add New filter options to Customer Tickets
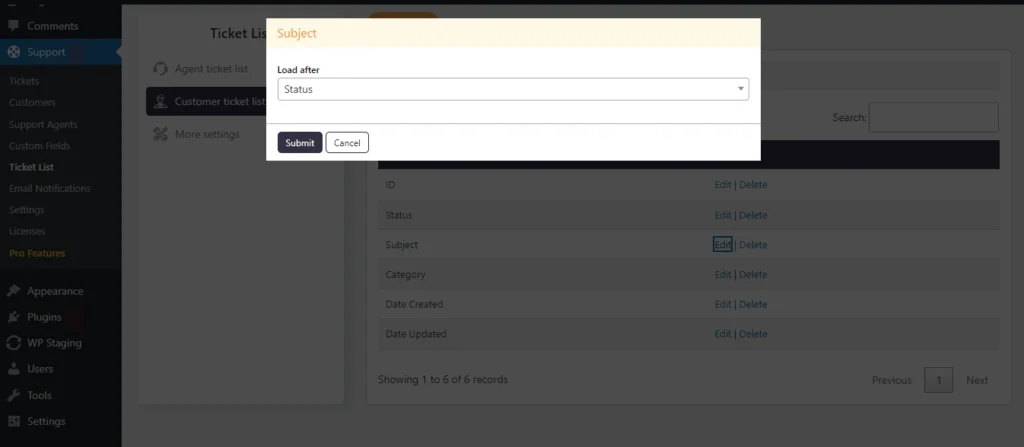
Edit Agent tickets Filter Items
- Go to the Ticket List → Customer ticket list → Filter items. Click the Edit link beside the field.
- You can only change the Load after setting
- Click Submit to apply your changes.
Screenshot 15: Edit filter options to Customer Tickets
Default Filters
- Go to Support → Ticket List → Agent ticket list → Default filters
- You can set the default filters that appear in the customer tickets screen, similar to the Agent Agent tickets screen.
Screenshot 16: Default filters in the Customer Tickets list
Adding Default Filters to Customer Tickets
- Go to Support → Ticket List → Agent Customer list → Default filters
- Enter the label; choose the Parent filter if needed.
- If required, apply conditional logic.
- Set the Enable drop-down to Yes.
- Click Submit.
Screenshot 17: Adding Default Filters to Customer Tickets
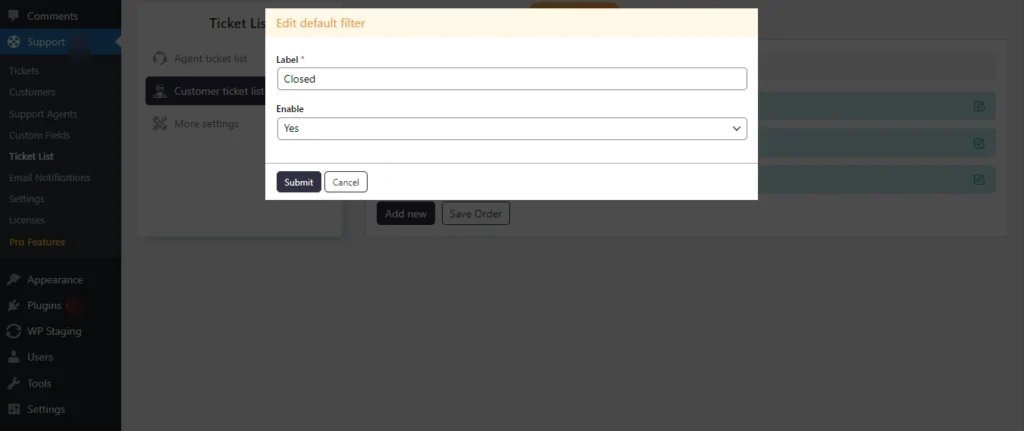
Edit Customer tickets Default Filter
- Go to Ticket List → Customer ticket list → Default filters
- Click on the edit icon beside the filter name.
- You can only edit the Label and its Enable status.
Screenshot 18: Edit Customer tickets Default Filter
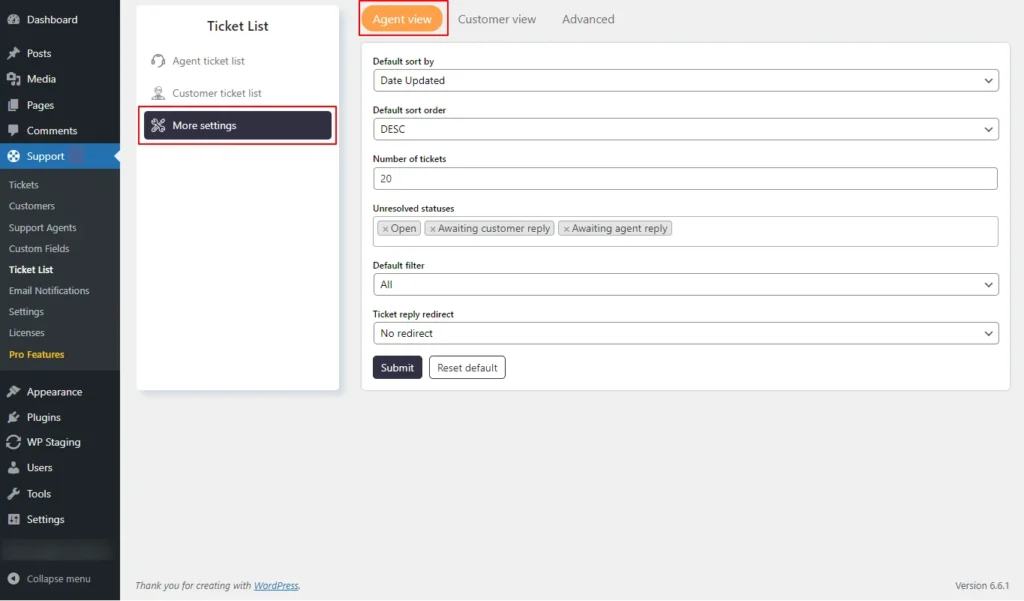
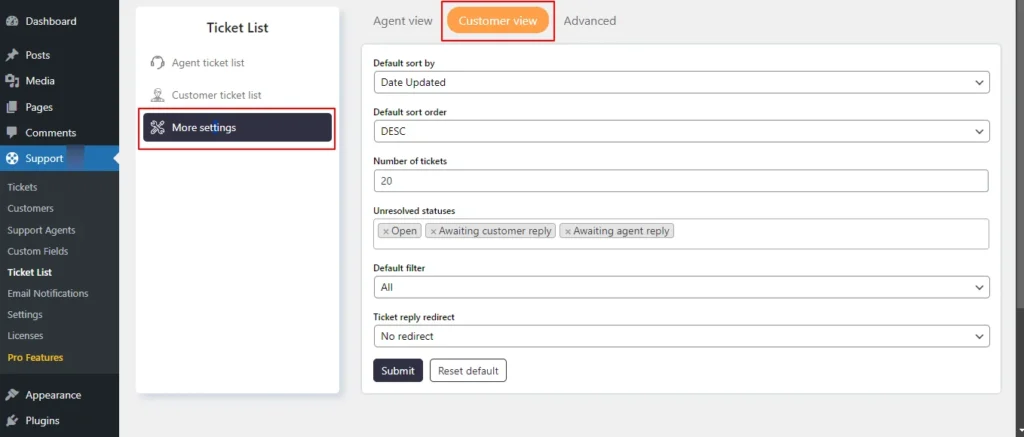
Step 3: More Settings
- Using the More settings tab, you can customize how the ticket list behaves for both agent and customer views.
- Here are the available settings for both:
- Default Sort By: Choose the default field by which tickets will be sorted.
- Default Sort Order: Set the default sort order (ascending or descending).
- Number of Tickets: Specify how many tickets will be displayed per page.
- Unresolved Statuses: Define the statuses that are considered unresolved.
- Default Filter: Set the default filter for the ticket list. Agents can adjust this further in their profile settings within the ticket portal.
- Ticket Reply Redirect: Choose what happens after a reply is added to a ticket. “No redirect” keeps the customer on the current ticket screen, while “Ticket list” redirects them back to the ticket list screen.
Agent view
Screenshot 19: More Settings Agent View
Customer view
Screenshot 20: More Settings Customer View
Advanced Tab
- You can define a closed ticket status group, where tickets with statuses in this group are treated as closed.
- Additionally, you can configure the default auto-refresh behavior for the ticket list. If enabled, the ticket list will automatically refresh every 10 seconds by default until you turn off this feature from the ticket list settings.
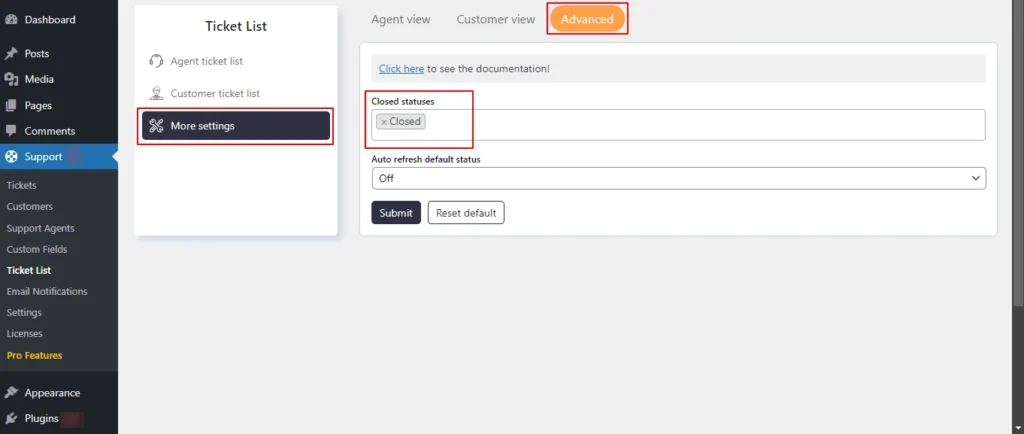
Screenshot 21: Advanced Tab
Email Notifications
- Using this menu, you can set up email notifications.
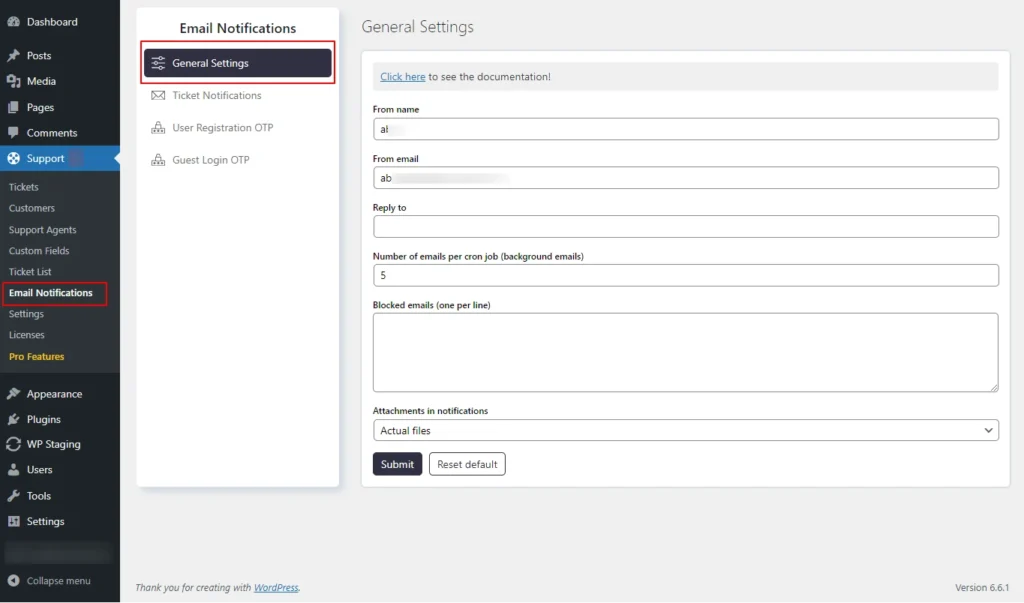
Step 4: General Settings
- Go to the Email Notifications section under the Support menu.
Screenshot 22: Email Notification → General settings
- Here, you can configure the following email settings:
- From name – Sender’s name.
- From email – From which email address will the email be sent
- Reply To – When a user replies to a notification, emails will be sent to the specified email address. If no address is provided, the “From” email address will be used as the reply-to address.
- Number of emails per cron job – Set the maximum number of emails that should be sent in a batch.
- Blocked Emails – Specify email addresses that should not receive email notifications.
- Attachments in notifications – configure to send emails with attachments (links or actual files )
Step 5: Ticket Notifications
- In this section, you can edit or create email notification templates.
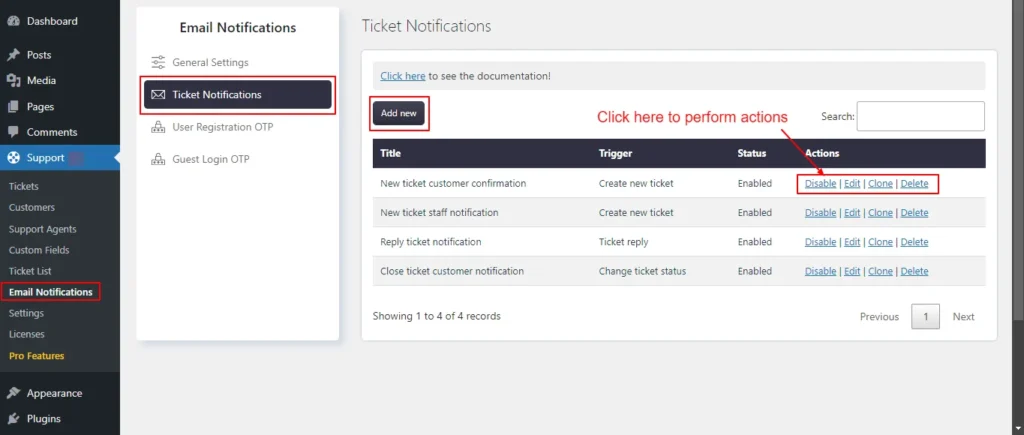
Screenshot 23: Ticket Notifications
Adding New Ticket Notification
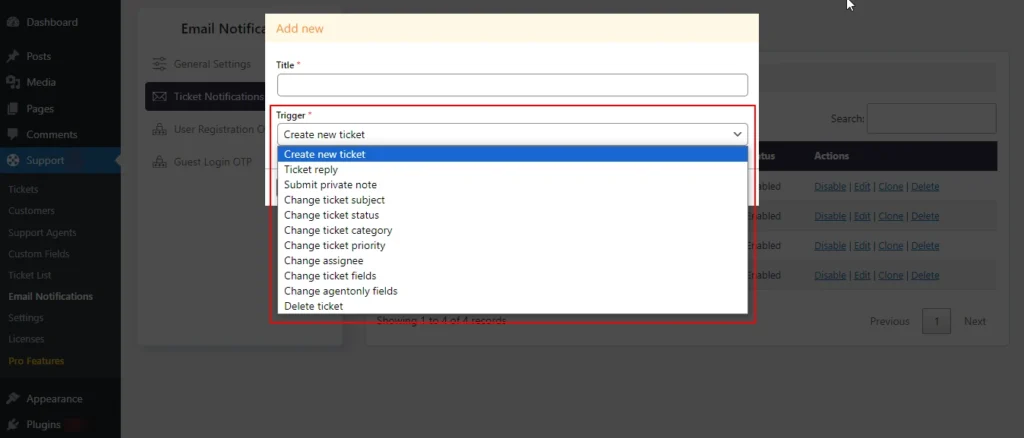
Screenshot 24: Add New Ticket Notification
- Click on Add New.
- Add Title and Select a Trigger
- Following are trigger events that can be used to send email notifications
- Cricket new ticket: When a new ticket is created
- Ticket reply: When a ticket receives a new reply, relevant parties are notified to the new response.
- Change ticket status: When the ticket status changes, for example, from Open to Awaiting customer reply, the activation occurs.
- Change ticket category: When the category of the ticket is modified
- Change ticket priority: When the priority of a ticket is changed
- Change assignee: When the assigned agent of the ticket is changed, it will trigger a notification to the new assignee.
- Delete ticket: When a ticket is deleted,
- Submit private note: When a private note is added to a ticket
- You must change the notification status to Enabled. Otherwise, this email notification won’t be sent.
- You can use macros or placeholders within the Subject and Body.
Editing Ticket Notifications
- Click on Edit button beside the template name for which you want to edit.
- You can manually add recipients in To address (required), CC, and BCC using the following settings
- General Recipients
- Agent Roles
- Custom Email Addresses (one per line)
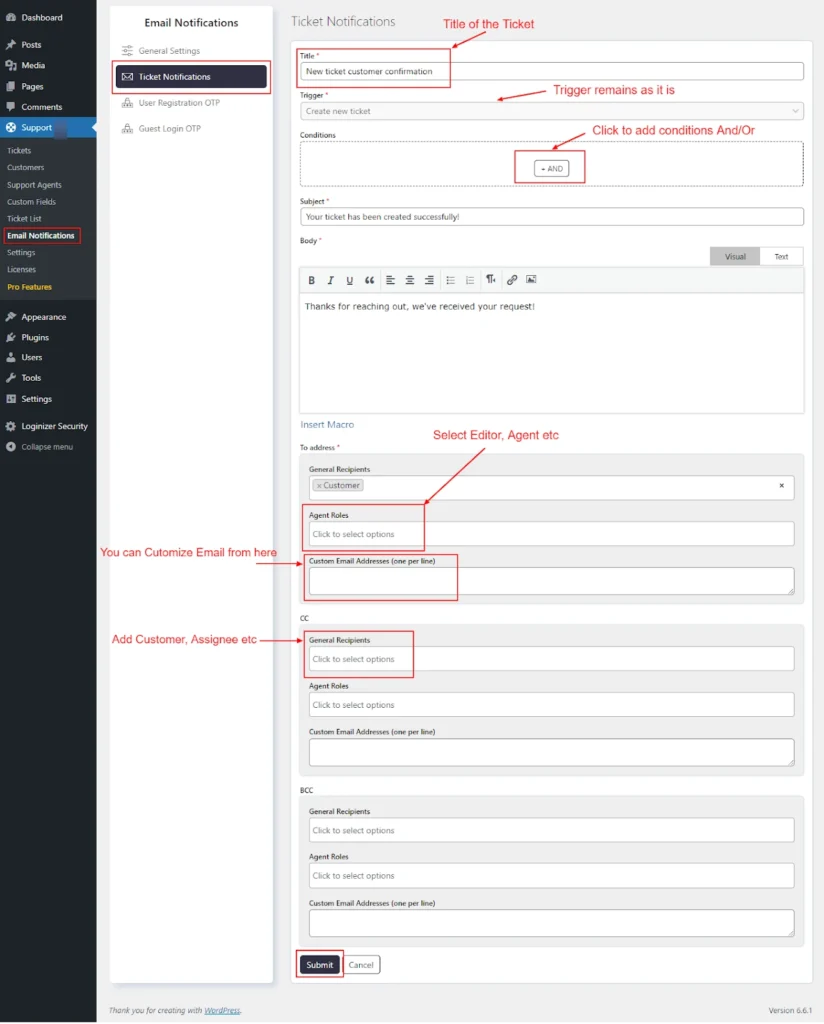
Screenshot 25: Editing Ticket Notifications
- You can Insert Macro in the email body
- Click on the Insert Macro button to view a list of available macros.
- The list will include placeholders for various types of data, such as customer name, status, date created, etc.
- Select the macro you wish to insert. For example, {{customer_name}} can be used to insert the customer’s name dynamically.

Screenshot 26: Insert macro current user name
- After clicking on the Insert button, the user name macro has been added under the body, as shown in the below screenshot.

Screenshot 27: User name Macro
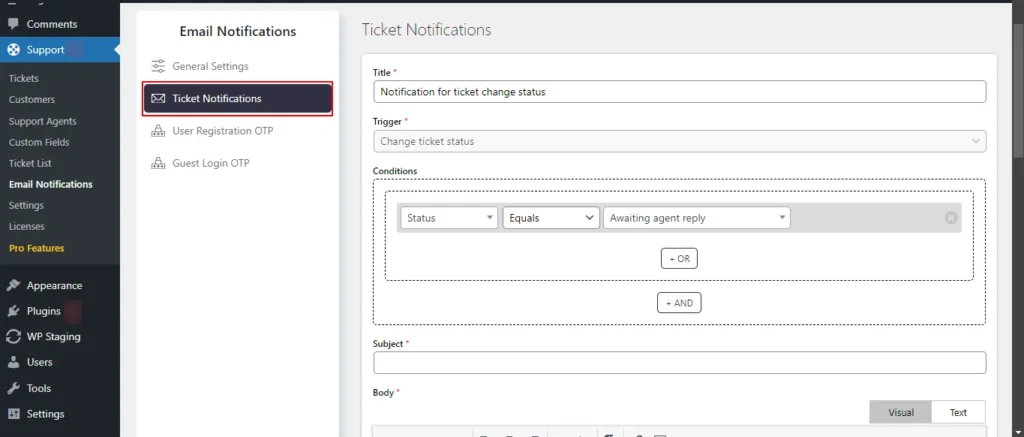
Conditions
- You can add And/Or conditions, and when they are met, then only an email notification is sent
- Let’s say that you want to send a notification for ticket change status to the Awating agent reply.
- Click on Add New under the Email Notifications → Ticket Notifications section. Set the trigger to Change Ticket status
- Under the Conditions section, set the Status equal Awaiting Agent reply.
- Add the subject, body, and email addresses to which this notification should be sent.
- Click Submit. Just now you configured that this notification should be sent when the status is Awating agent reply.
Sccreenshot 28: Setting Conditions in Ticket Notifications
Step 6: User Registration OTP
- This screen is to configure the email template for the Default registration of the supportcandy plugin. You can customize the email template that is used to send the OTP.
- The user registration OTP is a single-use password that is sent to verify the user’s email address when using the “Default” registration form.
- Within the body section of the setting, you can utilize macros (placeholders) in the email subject and body as shown below.
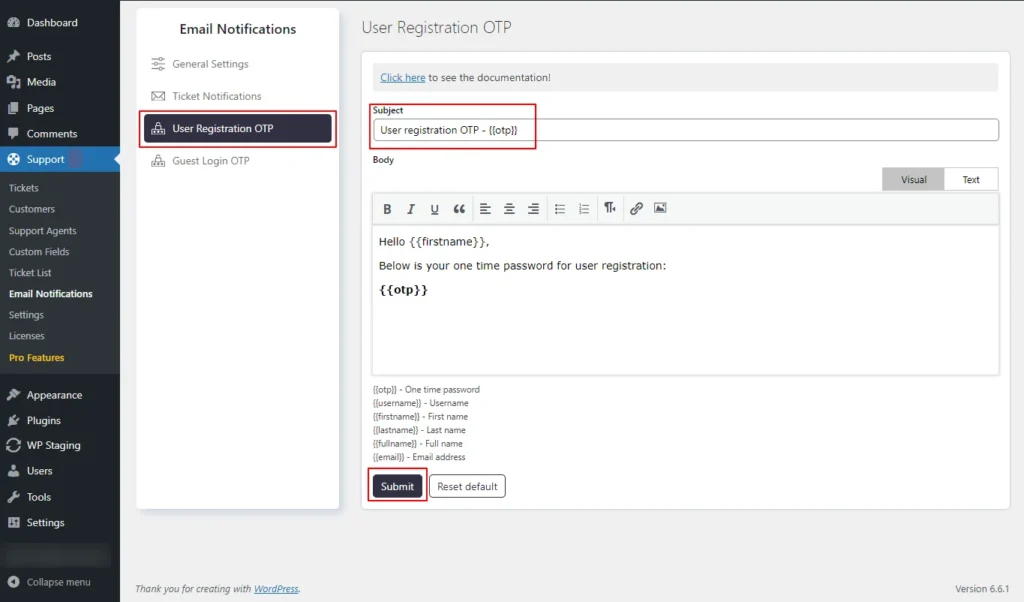
Screenshot 29: User Registration OTP
Step 7: Guest Login OTP
- To allow guest users to access their ticket list, you can activate an OTP (One Time Password) login.
- Keep in mind that OTP login is functional only when guest tickets are enabled. You can turn on this feature by navigating to Support → Settings → General Settings → Page Settings.
- Under the Guest Login OTP setting, you have the option to change the email template used for sending the OTP.
- On the same setting page, you can insert macros (placeholders) into the email subject and body.
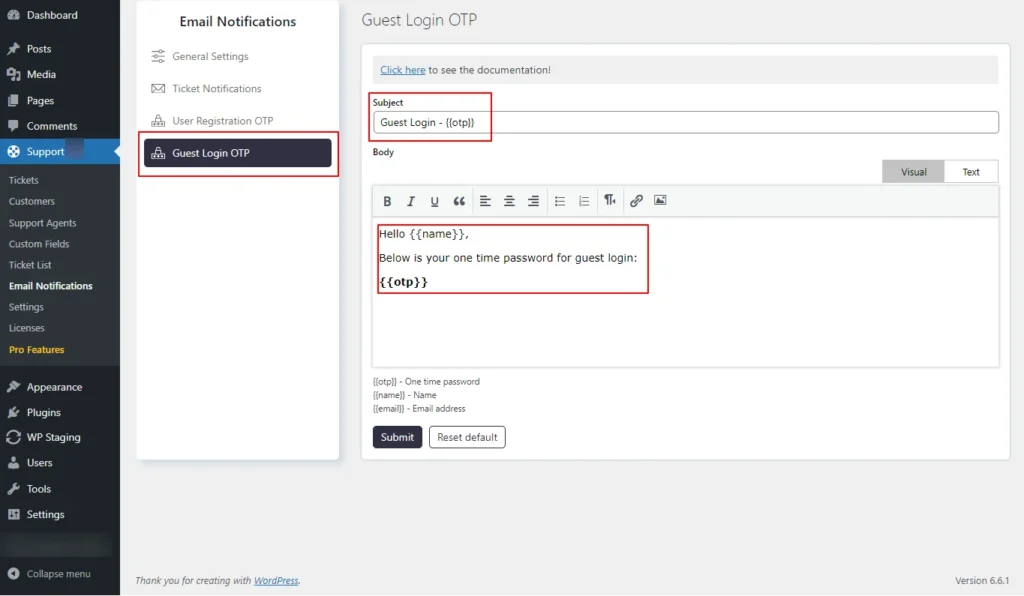
Screenshot 30: Guest Login email notification template for OTP
Conclusion
In this blog (Part 2 of the 3 Part Blog series), we walked you through the Ticket List, Customer Ticket List, Agent Ticket List and Email Notifications Sections.
That’s it for this article.
In the upcoming Part 3 of this series, we’ll explore even more advanced features to take your customer support to the next level.
If you need any help related to WordPress, contact our WordPress experts.
Build
Website
Themes