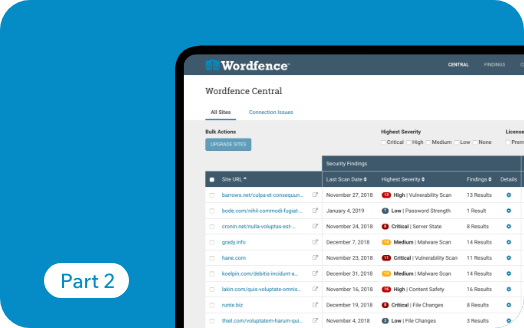
Introduction
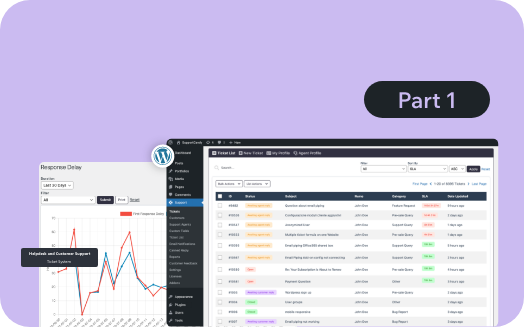
This blog is Part 2 of our series, exploring how the Wordfence plugin can help secure your enterprise website. In the previous post, Part 1, we installed and configured the plugin, understood the Wordfence Dashboard, and configured the Wordfence Firewall.
In Part 2, we discuss the following sections of the Wordfence plugin,
- Wordfence Scan
- Wordfence Tools
- Wordfence Login Security
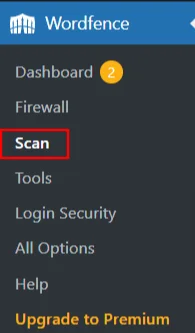
Wordfence Scan
Step 1: Scan
Wordfence checks your WordPress site for hidden threats like malware, backdoors, and suspicious URLs, all in one scan.
- Once you have configured the firewall, go to Scan.
Screenshot 1: Scan
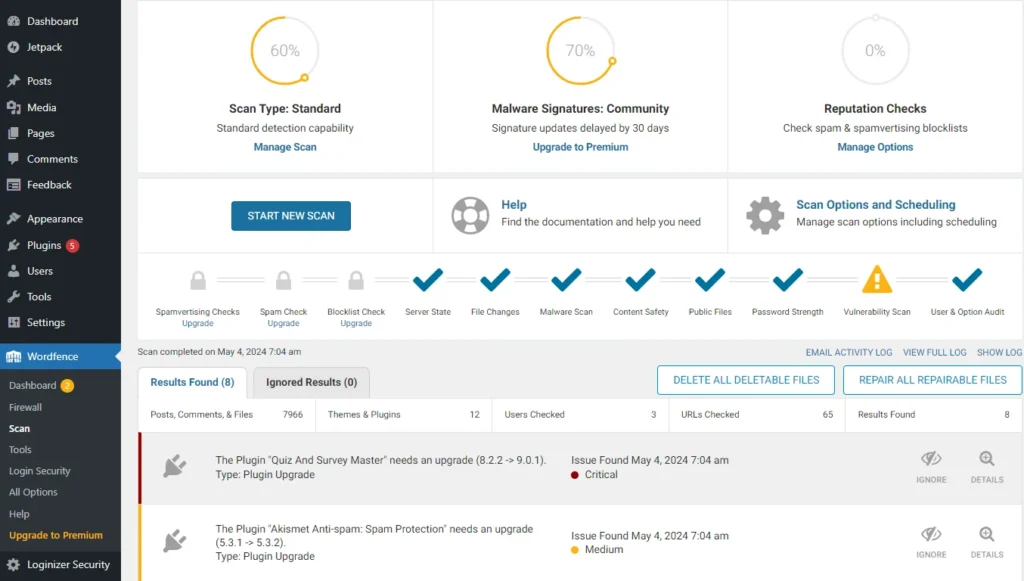
- The dashboard of Scan shows various aspects such as Scan Type, Malware signatures, Reputation checks, Scan options, and Scheduling.
- It also displays a detailed report of your scan.
Screenshot 2: Wordfence Scan Dashboard
Step 2: Manage Scan
- Click on Manage Scan on the Wordfence Scan dashboard.
Screenshot 3: Manage Scan
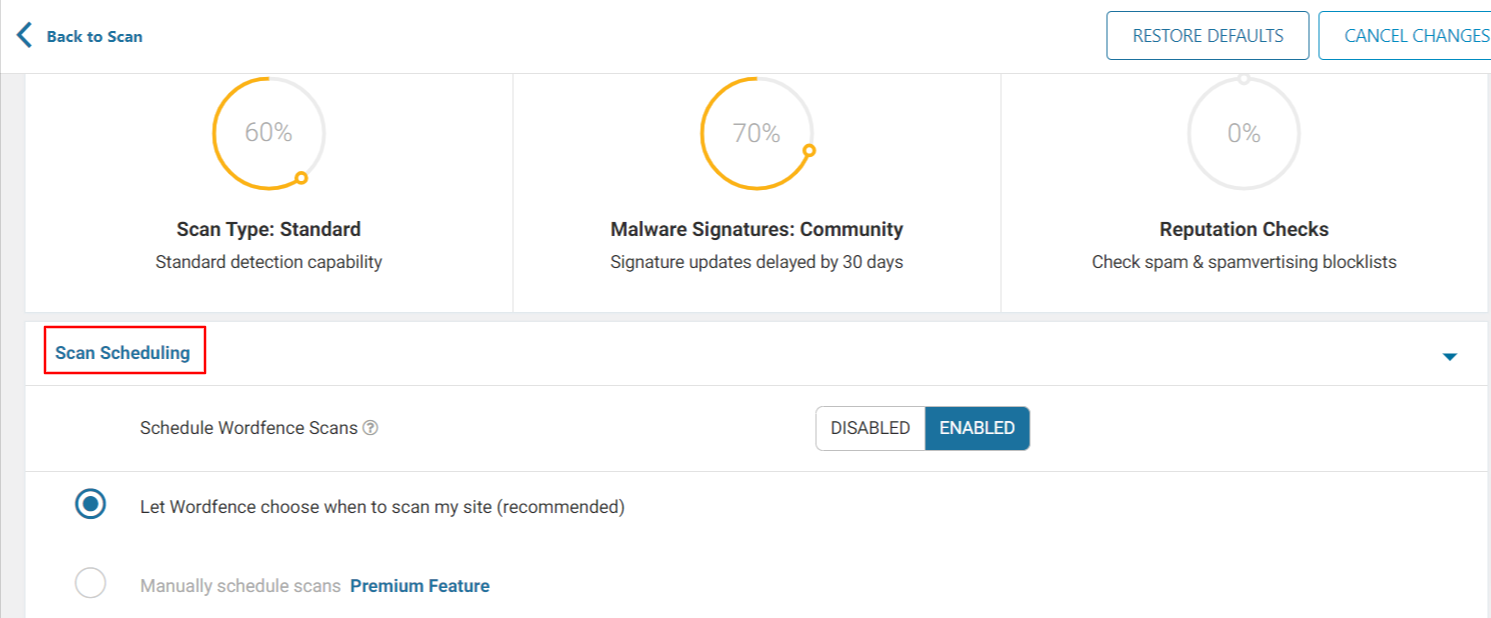
- Click on Scan Scheduling to Enable or Disable Wordfence Scheduled Scans. By default, it is enabled.
- You can choose either automatic scans scheduled by Wordfence or scan manually (premium feature).
Screenshot 4: Scan Scheduling
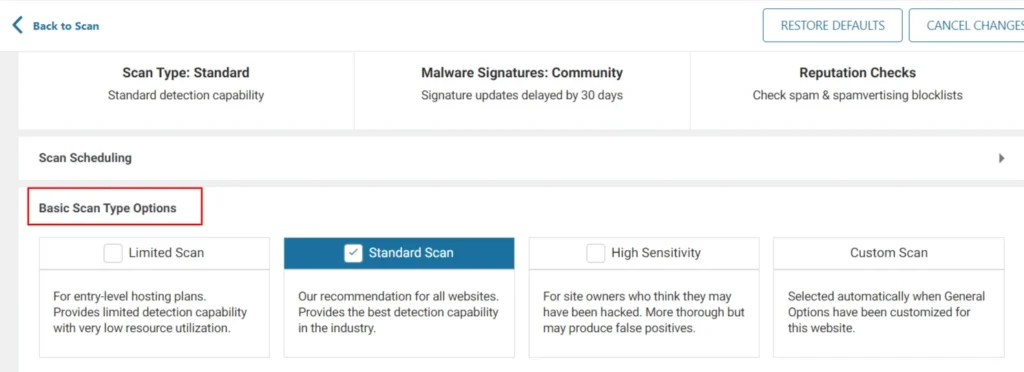
- After you have selected how to schedule your scans, you can choose the Basic Scan Type options.
- Depending on the type of your requirement, you can select the type of scan:
- Limited Scan: Designed for entry-level hosting, this plan provides a basic level of threat detection without using many server resources.
- Standard Scan: Selected by default, this option is recommended by Wordfence for all websites.
- High sensitivity: This is a more in-depth scan ideal for those who believe their site may have been breached, but be aware it might identify some safe actions as potential threats.
- Custom Scans: Automatically chosen after you adjust General Options for this site.
Screenshot 5: Basic scan Type Options
- After you have chosen the Basic Scan Type option, go to General Options.
- Here you can choose what to scan on your website.
- This includes Spamvertising Checks, Spam Checks, Blocklist Checks, Server State, File Changes, Malware Scans, Content Safety, Public Files, Password Strength, Vulnerability Scans, and User & Option audits.
- Some options are selected by default, but you can customize it further by choosing the options that best fit your requirements.
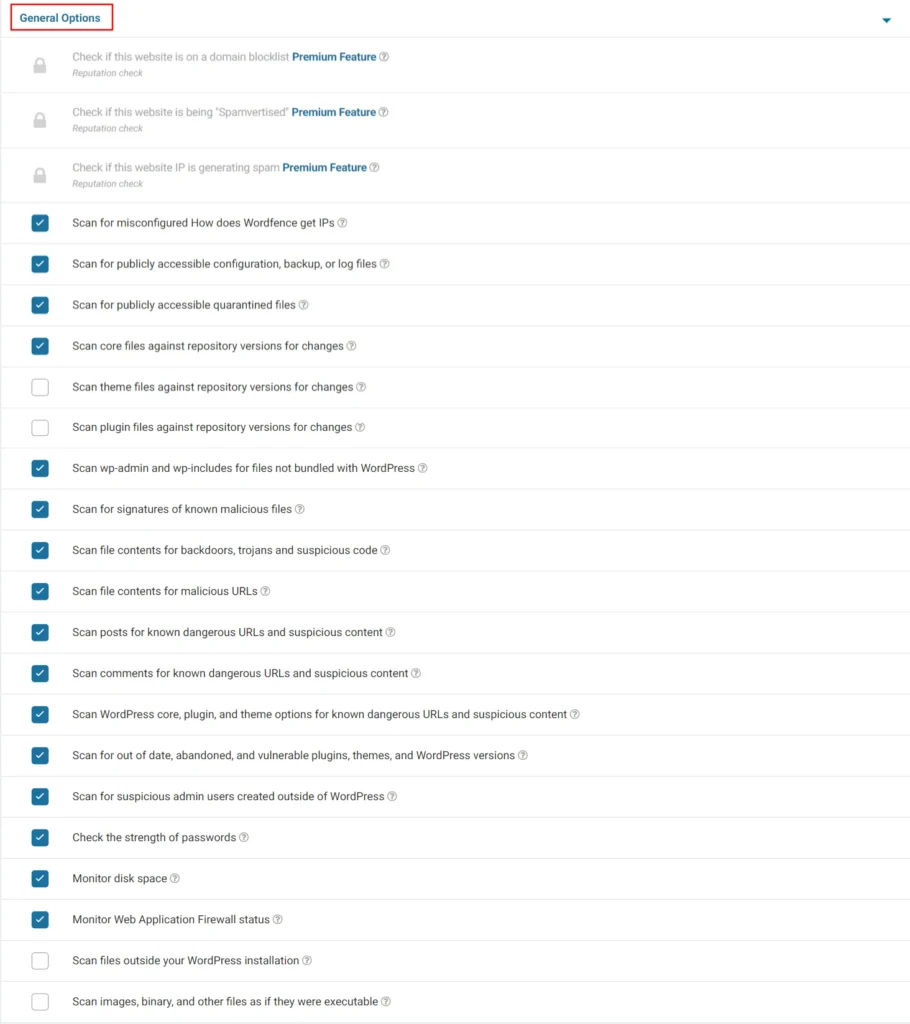
Screenshot 6: General Options
- After you have selected General Options, go to Performance Options.
- Here you can optimize the server performance by choosing to Use Low Resource Scanning, Limit the number of issues sent in the scan results email, Time limit that a scan can run in seconds (by default it is three hours), How much memory should Wordfence request when scanning (256 by default), and Maximum execution time for each scan stage.
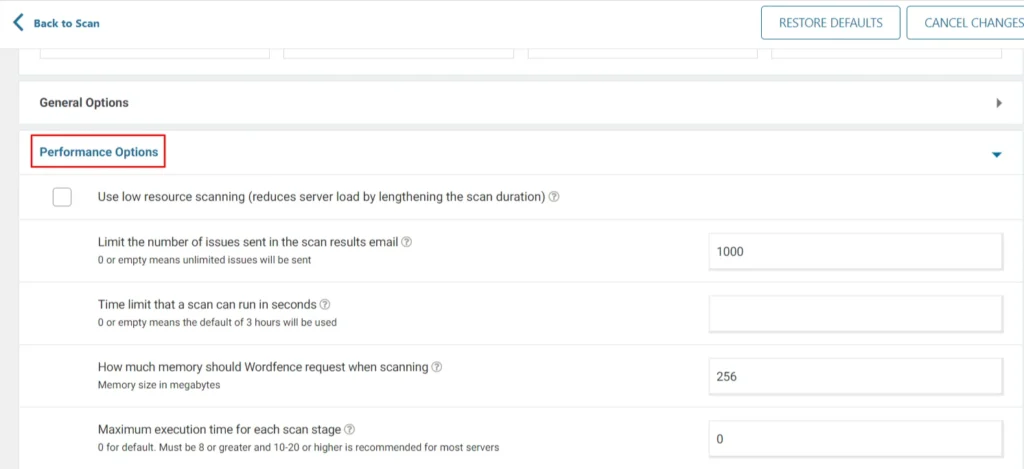
Screenshot 7: Performance Options
- Go to Advanced Scan Options to:
- Exclude files from scan that match these wildcard patterns: If you have large, safe files like backups that Wordfence keeps getting hung up on, this feature lets Wordfence to ignore certain file extensions.
- Additional scan signatures: This section lets you define custom scan signatures that the scanner will use to identify malware during checks. However, this is an advanced option that only works well if you understand how malware signatures are built and how they function.
- Use only IPv4 to start scans: Check this if you want to avoid connecting your site to IPV6.
- Maximum number of attempts to resume each scan stage: Internal connection problems can make Wordfence scans fail. It retries 2 times by default (up to 5). You can disable retries by setting it to 0.
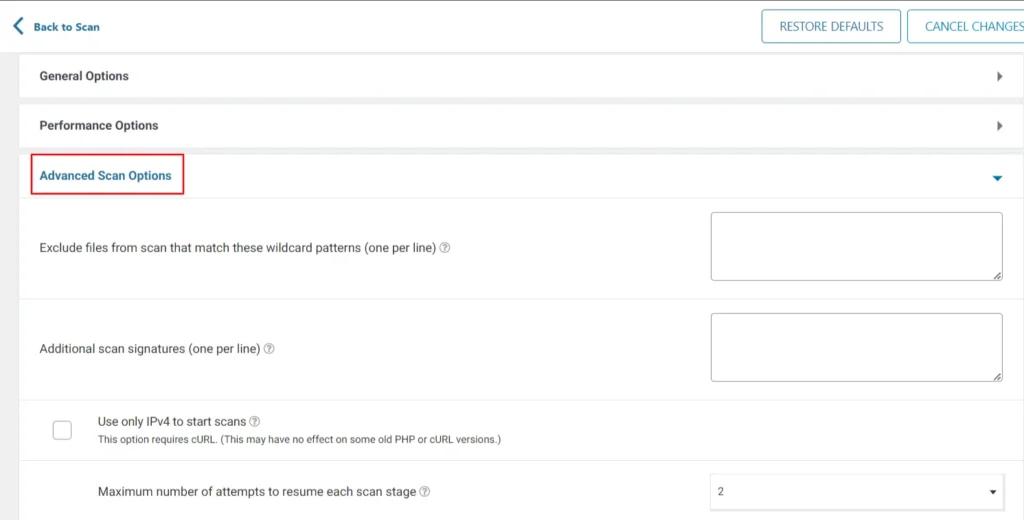
Screenshot 8: Advanced Scan Options
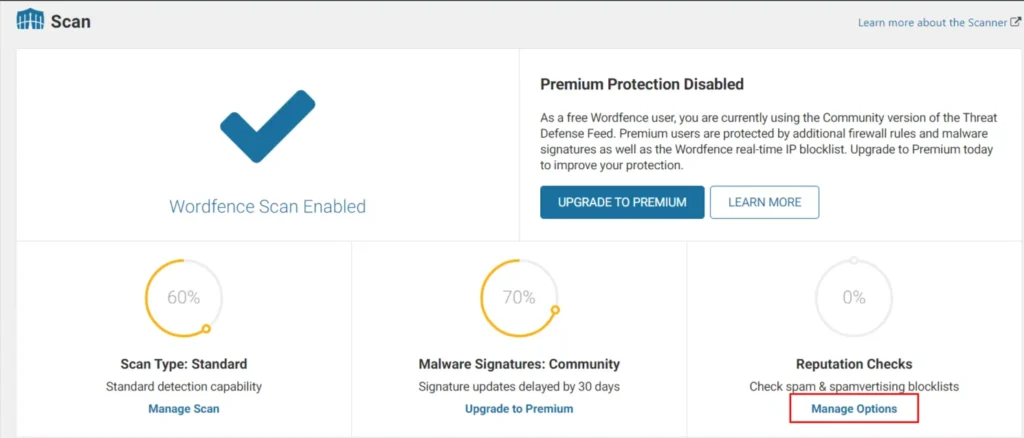
Step 3: Manage Options (Reputation Check)
- Wordfence’s Reputation Check feature monitors your website’s reputation on known databases of compromised and dangerous sites. It checks if your website is listed on three blacklists, and alerts you if your domain or IP is blacklisted. (Premium Option)
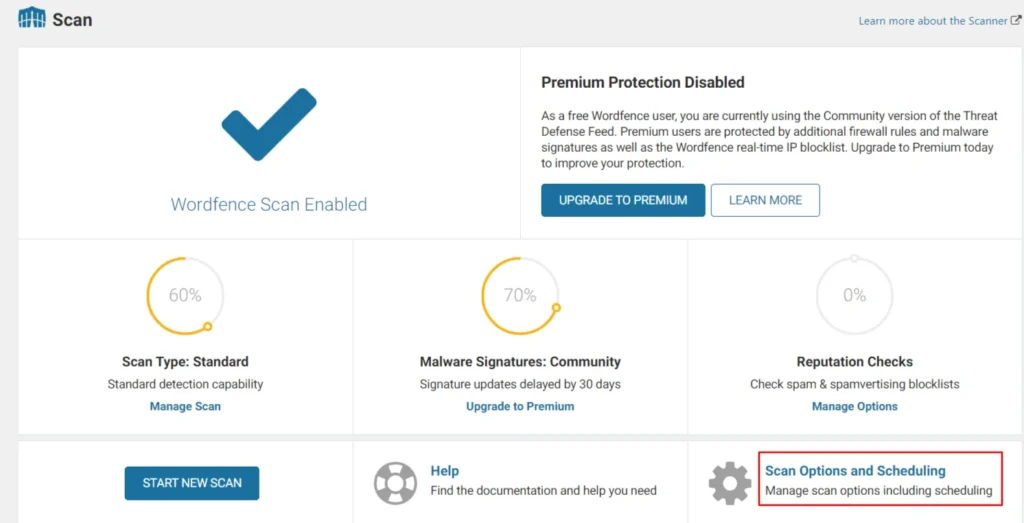
- Under the status circle of Reputation Check, you’ll see Manage Options.
- This will take you to the General Options covered above under Manage Scan Step 8.

Screenshot 9: Manage Options
Step 4: Scan Options and Scheduling
- Wordfence’s Scan Options and Scheduling dashboard allows users to set up automatic or manual scans.
- Clicking on this link will take you to Scan Scheduling, Scan options and Scheduling already covered above in Manage Scan.
Screenshot 10: Scan Options and scheduling
Step 5: Start New Scan
- After you are done customizing, you can Start New Scan.
- By default, scans are enabled to run automatically. The free version of Wordfence runs a quick scan every day and a full scan every 72 hours, while the Premium version runs a quick scan daily and a full scan every 24 hours.
- However, if you wish to scan again, you can select this option.
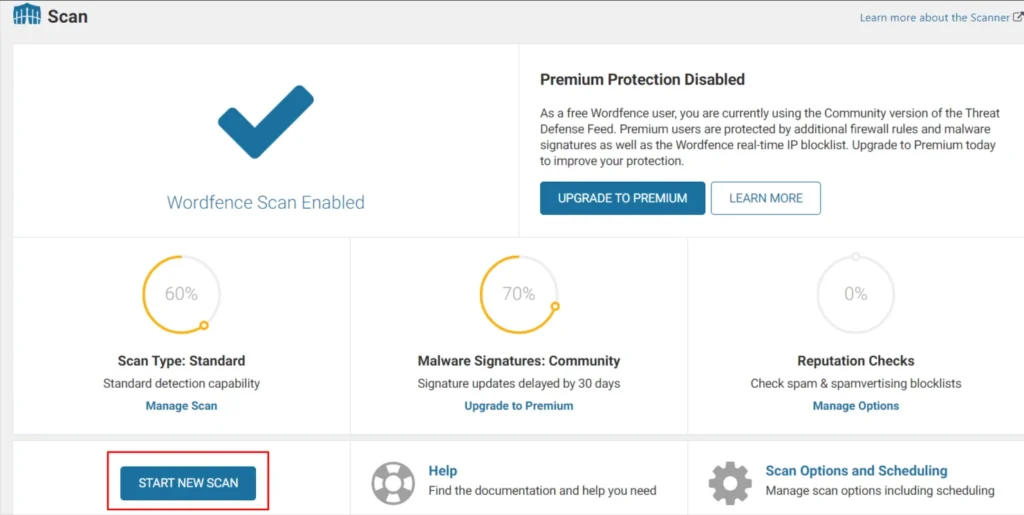
Screenshot 11: Start New Scan
Step 6: Scan Stages
- Wordfence scans your site in stages, with icons showing progress and any problems found. A blue check means all is clear, while a yellow warning means something needs attention.
- The stages include Spamvertising Checks, Spam Checks, Blocklist Checks, Server State, File Changes, Malware Scans, Content Safety, Public Files, Password Strength, Vulnerability Scans, and User & Option audits.
- The settings for these can also be found in General Options under Manage Scan.

Screenshot 12: Scan Status
Step 7: Handling Scan Results
- The result of a Wordfence scan will vary depending on what it finds on your website.
- The report shows Results Found and Ignored Results (false positive results).
- It also shows the numbers for Posts, Comments, & Files, Themes & Plugins, Users Checked, and Results Found.
- You can take action by clicking on Delete all Deletable Files and Repair all Repairable Files.
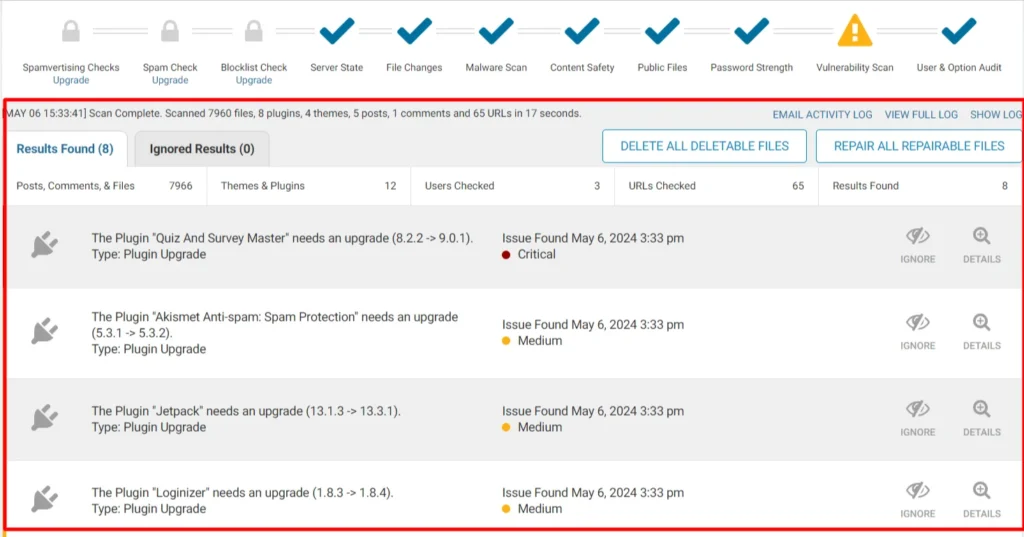
Screenshot 13: Scan Result
Wordfence Tools
Step 8: Tools > Live Traffic
- Go to Wordfence> Tools.
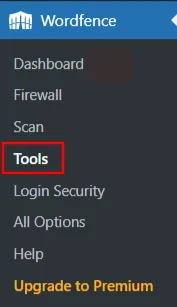
Screenshot 14: Tools
- The screen will display Live Traffic.
- Wordfence “Live Traffic” gives you a real-time view of your website activity, including things missed by analytics tools. It tracks everything happening at the server level, so you see visits from bots, crawlers, and even hack attempts, not just human visitors with Javascript enabled.
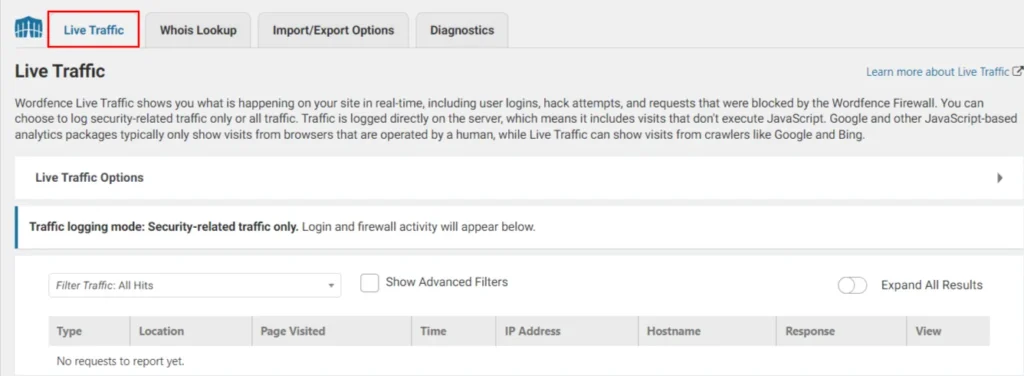
Screenshot 15: Live Traffic
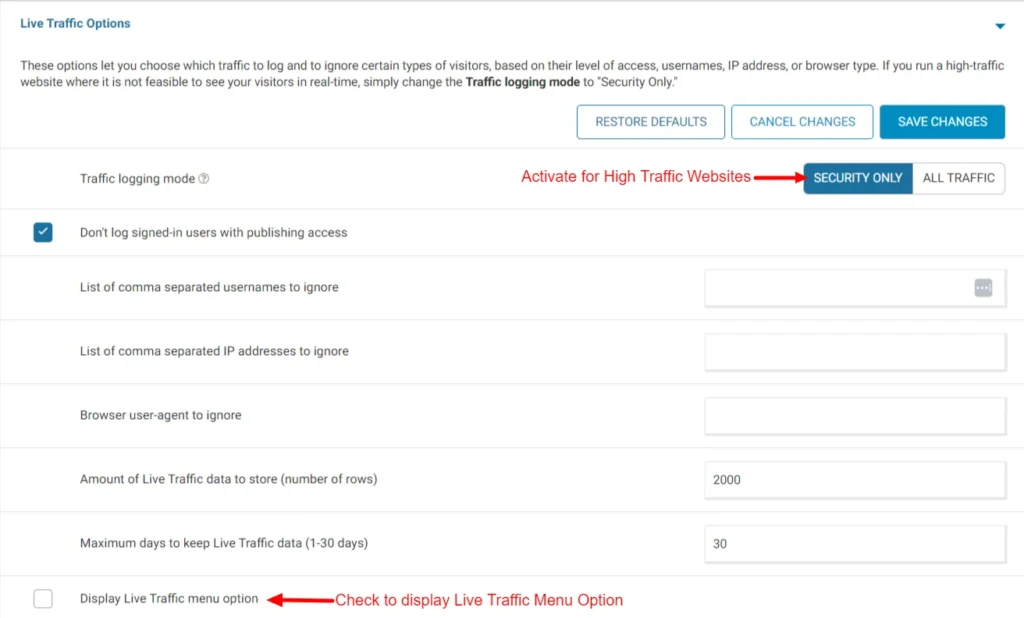
- Select Live Traffic Options to choose which traffic to log or ignore some types of visitors, and other options.
- This functionality provides granular control over traffic logging. You can define which visitor interactions are recorded based on access level, user credentials, IP address, or browser type.
- You can choose options like Don’t log signed-in users with publishing access, List of comma separated usernames to ignore, Browser user-agent to ignore, and others (refer to screenshot below).
- For high-traffic websites where real-time monitoring might not be practical, the Traffic logging mode can be adjusted to Security Only to prioritize security-related events.
- You can also check to Display Live Traffic menu option.
- Click on Save Changes at the end.
- Click on Restore Defaults to restore the default options.
Screenshot 16: Live Traffic Options
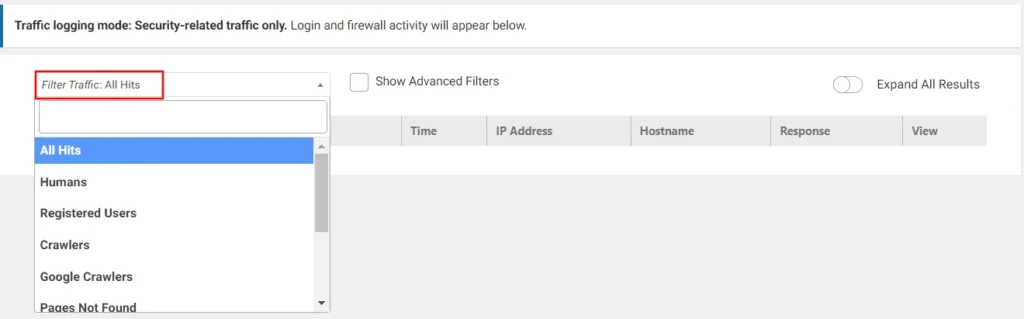
- You can filter Live Traffic data based on various filters like All Hits, Humans, Crawlers, Registered Users, Page Not Found, Blocked by Firewall, and others.
Screenshot 17: Filter Traffic
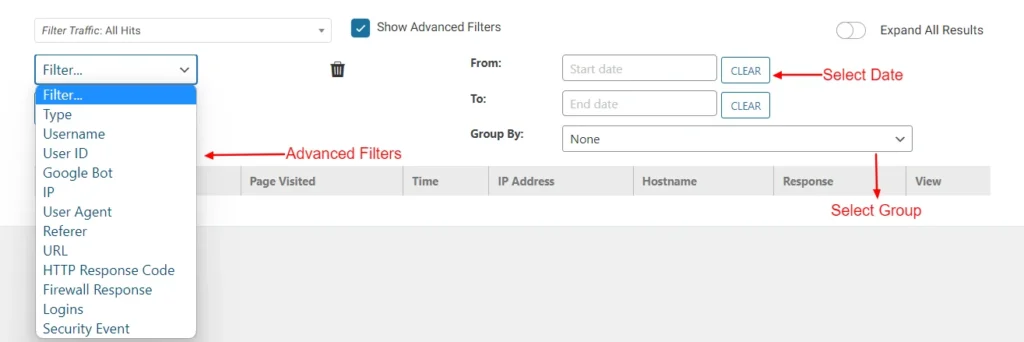
- Check Show Advanced Filters to customize your Live Traffic data.
- In this, you can have advanced filters like Username, Google Bot, IP, URL, and many others. You can also add your filter by clicking on Add Filter.
- You can set the time period for which you want to view the traffic.
- Select the Group By to view the traffic according to the option selected.
Screenshot 18: Advanced Filters, Select Date, and Select Group

Screenshot 19: Add Filter
Step 9: Tools > Whois Lookup
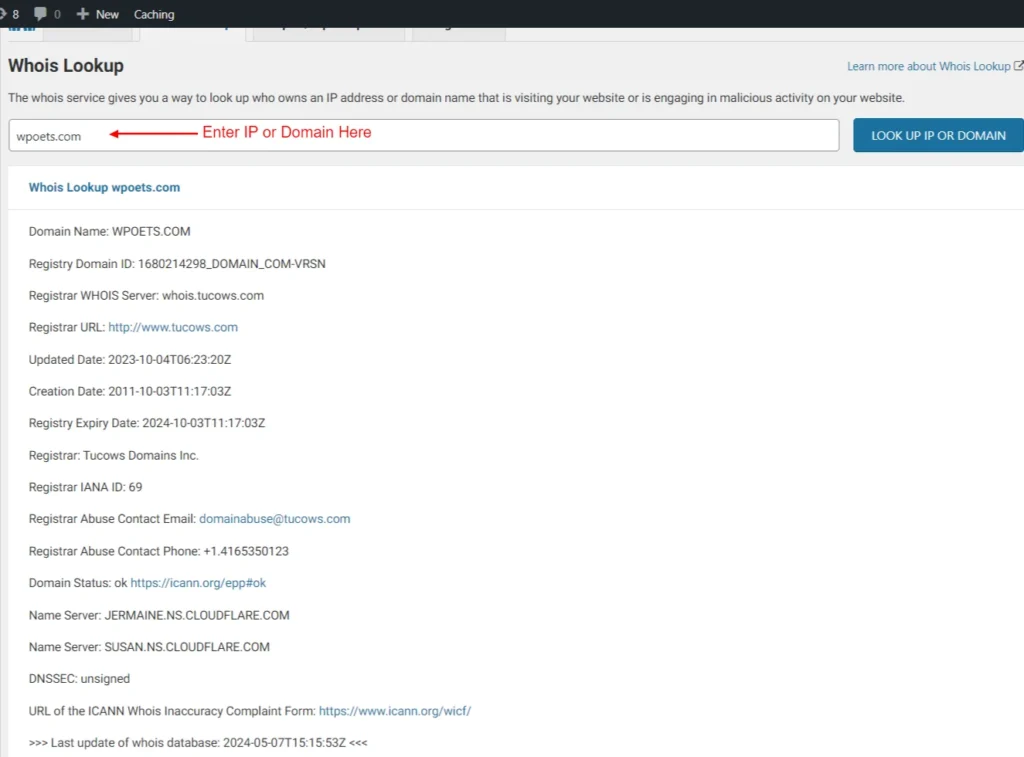
- Whois Lookup helps to identify the owner behind an IP address or domain name. This is particularly useful for investigating suspicious website visitors or malicious activity.
- To utilize this feature, simply enter the desired domain name and initiate the lookup process. This will provide details such as registration date, expiration date, registrant information, and potentially associated contact email addresses.
Screenshot 20: Whois Lookup Tool
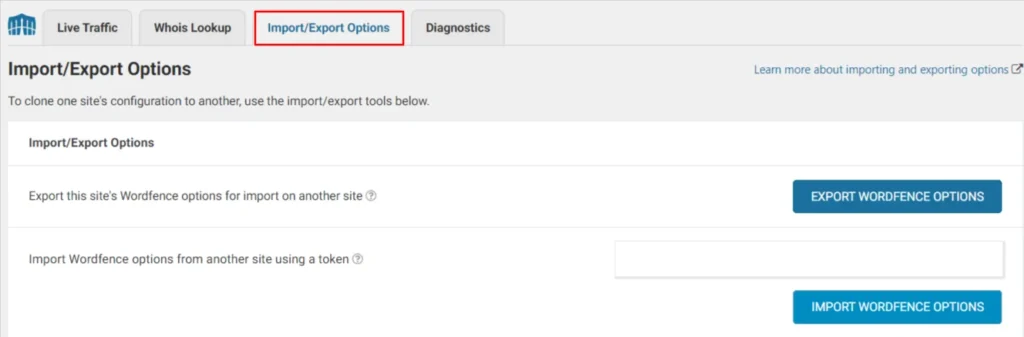
Step 10: Tools> Import/ Export Options
- Go to Import/ Export Options to establish cloning across multiple sites.
- You can either Export this site’s Wordfence options for import on another site or Import Wordfence options from another site using a token.
- The export and import process generates a token, a unique alphanumeric string. This token should be treated with the same level of confidentiality as your login credentials.
- Unlike other systems, Wordfence tokens are permanent, ensuring the continued availability of your exported settings.
Screenshot 21: Import/ Export Tool
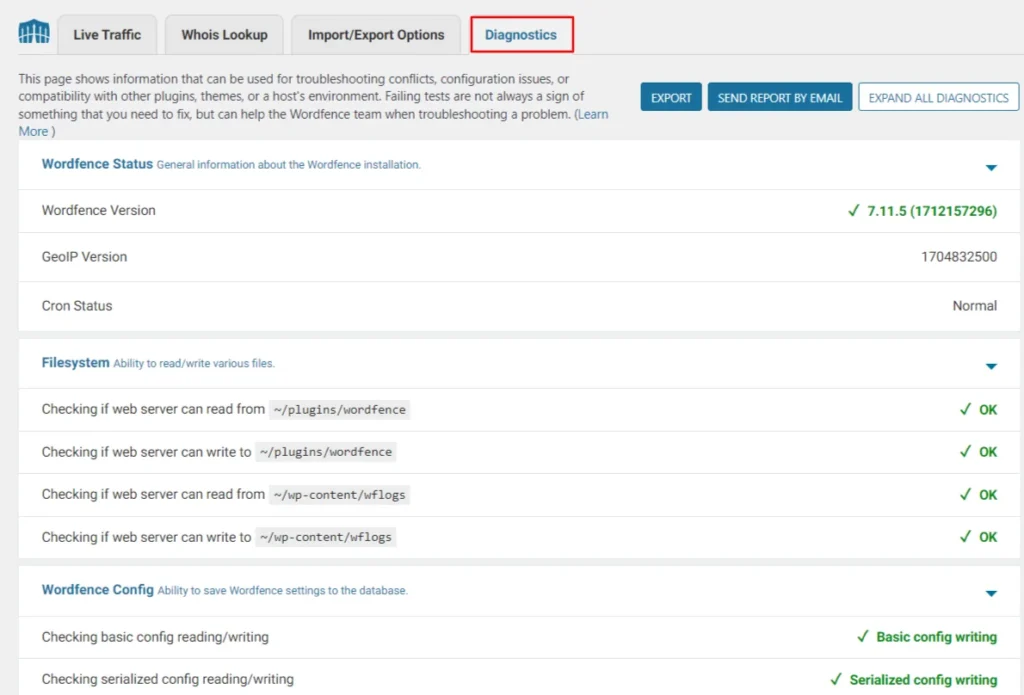
Step 11: Tools> Diagnostics
- Go to Tools> Diagnostics to access information when you are facing issues with Wordfence and need troubleshooting.
- This guide assists in troubleshooting conflicts, configuration issues, or compatibility problems with plugins, themes, or your hosting environment.
- You will have access to information about Wordfence installation, current WAF configuration, PHP version, Database version, status of installed themes, and many others.
- You can choose to Export or Send Report by Email.
- Click on Expand All Diagnostics to view all information at once.
Screenshot 22: Diagnostics Tool
Wordfence Login Security
Step 12: Login Security
- Go to Wordfence> Login Security for 2-factor Authentication.
Screenshot 23: Wordfence> Login Security
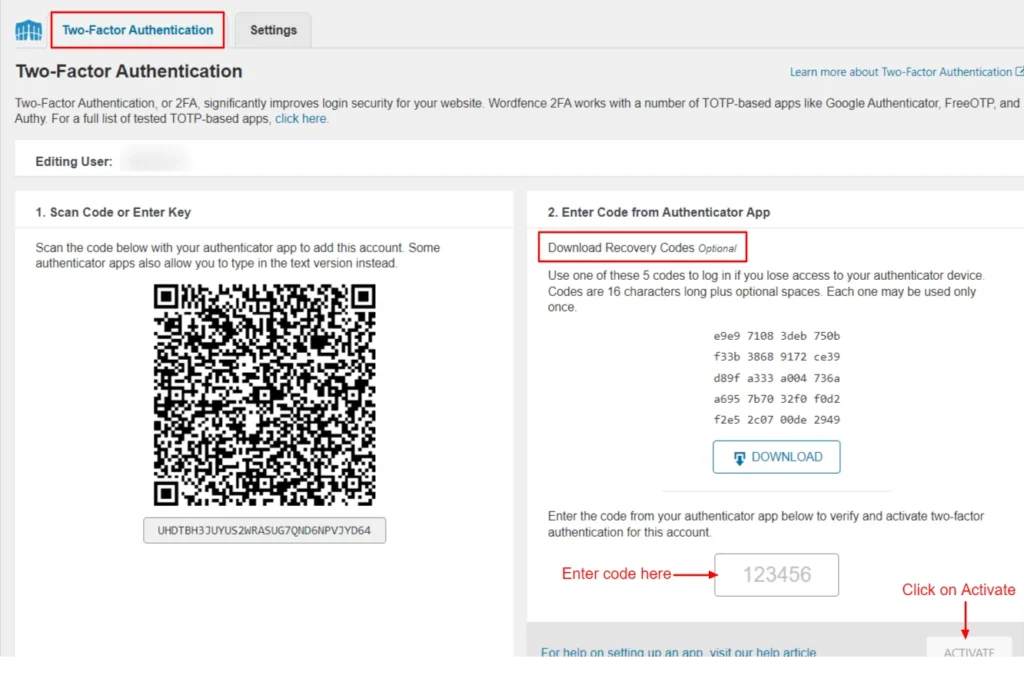
- This option enables Two-Factor Authentication for your Wordfence.
- To add your account in the authenticator app, Scan the QR code displayed, or enter the code.
- The authenticator app will generate a code, which is to be entered to verify and activate Two-Factor Authentication.
- If you face any issues logging into your authenticator app, Wordfence provides you with 5 recovery codes. Each of these codes can be used only once.
- Click on Activate.
Screenshot 24: Two-Factor Authentication
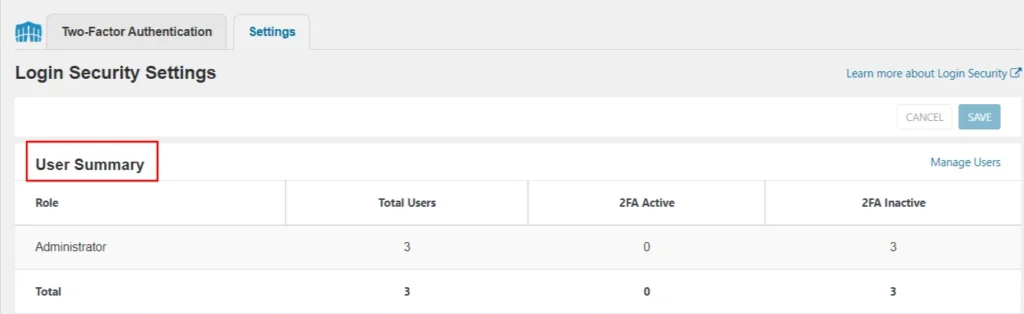
- Go to Login Security> Settings.
- This Login Security page offers functionalities to enhance login security, including two-factor authentication (2FA) and reCAPTCHA.
- The report begins with a User Summary, providing a breakdown of users who have activated two-factor authentication (2FA) and those who haven’t.
Screenshot 25: User Summary
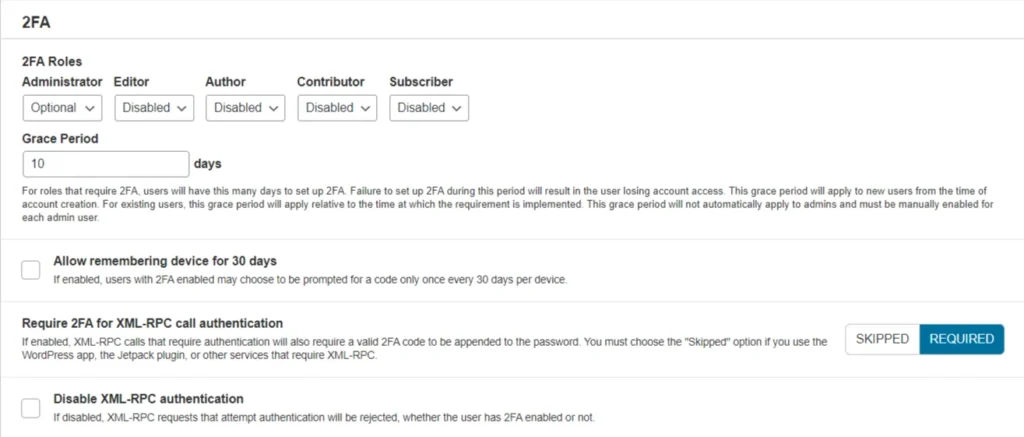
- By default, only admins (or super-admins in multisite) can use 2FA. You can extend it to other roles:
- Required: Enforces 2FA for specific roles (with a grace period).
- Optional: Allows, but doesn’t require, 2FA for certain roles.
- Disabled: Prevents 2FA usage for a role (except Admin).
- Users manage their own 2FA devices through a dedicated “Login Security” menu (visible when enabled for their role).
- 2FA enforcement includes a grace period for required roles, preventing immediate lockouts.
Screenshot 26: 2FA Settings
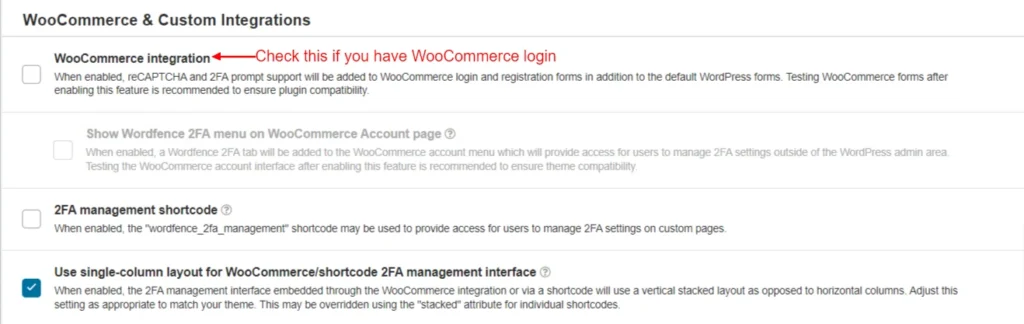
- Check WooCommerce Integrations if you have the WooCommerce plugin activated.
Screenshot 27: WooCommerce and Custom Integrations
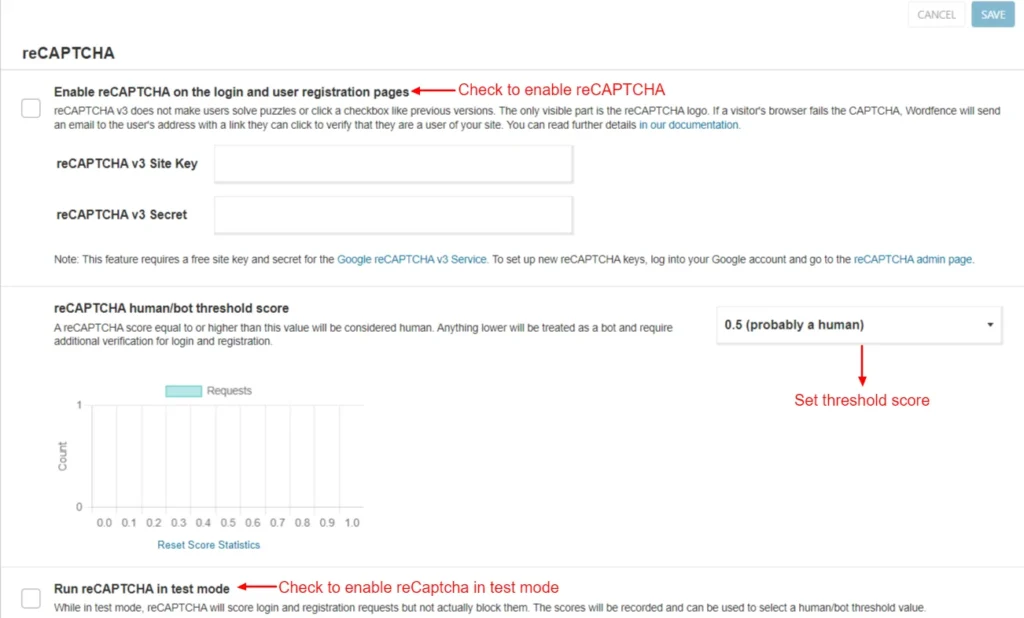
- Check Enable reCAPTCHA on the login and user registration pages box for enhanced security and enabling reCAPTCHA.
- Activate by entering the site key.
- For optimal balance, fine-tune the captcha’s threshold (default 0.5) based on your site’s score history.
Screenshot 28: reCAPTCHA
- The General settings have the inclusion of Allowlisted IP addresses that bypass 2FA and reCAPTCHA, NTP Protocol (Network Time Protocol), last login timestamp, and deletion of security settings and of 2FA upon deactivation of the plugin.

Screenshot 29: General Settings
Wordfence All Options
The All Options section of Wordfence includes Wordfence Global Options, Firewall Options, Blocking Options, Scan Options, and Tool Options.
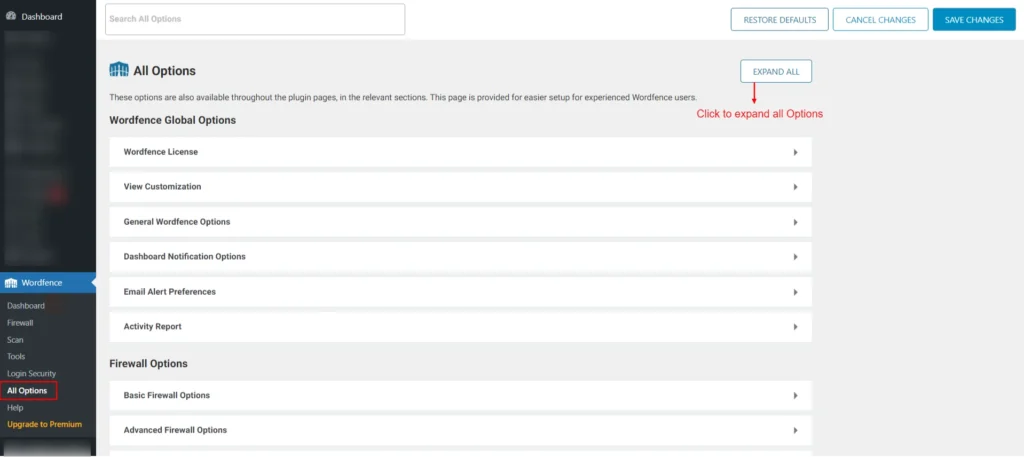
Screenshot 30: All Options
Conclusion
By now, you have gained insight on why security is important to your enterprise website, and how Wordfence is a good fit for it. With its comprehensive features and user-friendly interface, Wordfence empowers you to take control of your website security and keeps your enterprise website well-protected.
We hope this guide has equipped you with the knowledge and resources to secure your website. Remember, website security is an ongoing process. Stay vigilant, keep your software updated, and leverage tools like Wordfence to maintain a strong defense against ever-evolving threats.
Build
Website
Themes