Introduction
In today’s competitive landscape, providing exceptional customer support is a top priority for businesses to maintain a loyal client base. Whether you run an online eCommerce store, a membership site, a product, or a service-based business, having a robust customer support system is essential for maintaining a positive customer experience.
Integrating a helpdesk and customer support ticket system directly into your WordPress website can be a game-changer.
In this step-by-step guide, we’ll delve into the process of integrating a robust customer support ticket system into your WordPress website using the SupportCandy plugin.
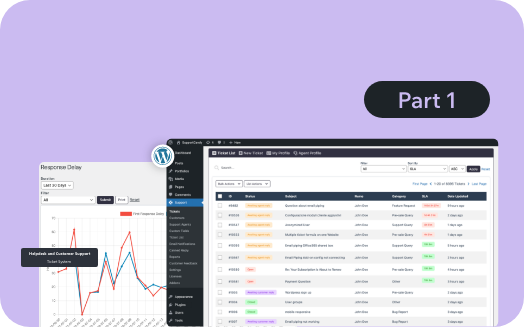
This is a three-part blog series. In this Part 1 article, we discuss the following sections of the SupportCandy.
- Installation and Setting up the Plugin
- Tickets
- Customers
- Support Agents
- Custom Fields
The step-by-step process of adding a customer support system to WordPress using the SupportCandy
Step 1: Installing the SupportCandy plugin
- In the beginning, go to your WordPress homepage.
- For the Plugins tab, click on it.
- Press the Add New button.
- Use the search bar to look for SupportCandy.
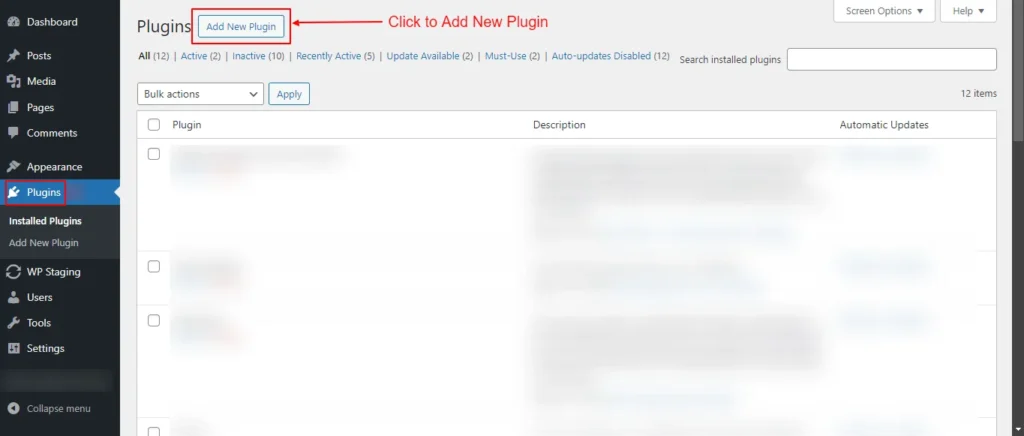
Screenshot 1: Click on Add New Plugin
- Click the Install Now button under the plugin SupportCandy—Helpdesk & Support Ticket System.
- Click the Activate button, and you are done!
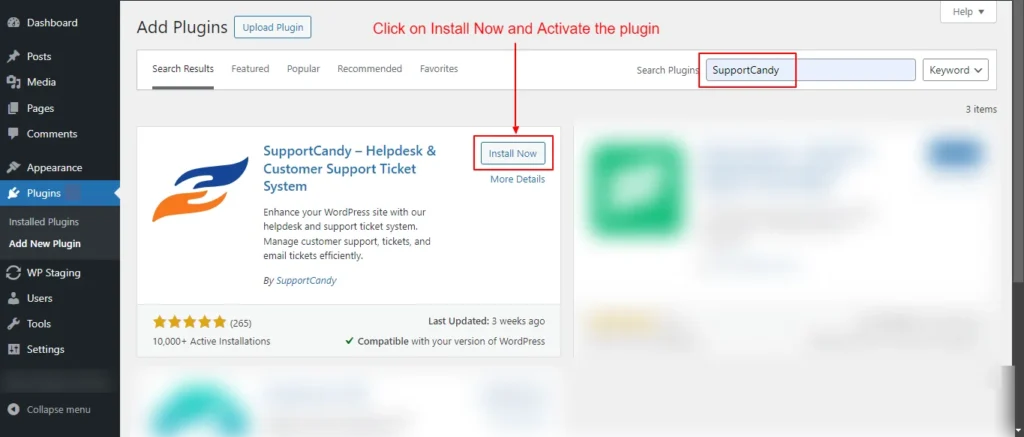
Screenshot 2: Install and Activate the Plugin
Step 2: Setting up Frontend Pages
Once the plugin is activated, we need to create web pages to embed SupportCandy shortcodes to display various support-related features and functionality.
Support requests Page
- Go to the WordPress Pages menu. Click on the Add New Page. Name the page Supports Requests.
- Add the shortcode ‘[supportcandy]’ to this page and save it.
- Go to the Support Candy menu Support → Settings → General Settings → Page Settings.
- Select the newly created page Support Requests under the Support page dropdown.
- Save the settings by clicking the Submit button.

Screenshot 3: Create a New WordPress Page Support Requests
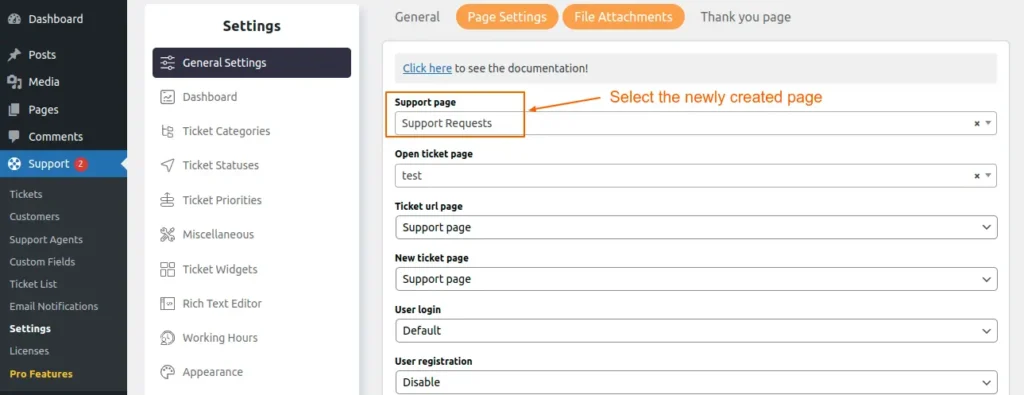
Screenshot 4: Add it to Support → Settings → General Settings → Page Settings
Tickets
Step 3: Ticket List (Viewing Tickets)
- Navigate to the Tickets section under the SupportCandy menu.
- Here you will see a list of all tickets.
- Use the filters and search bar to find specific tickets.
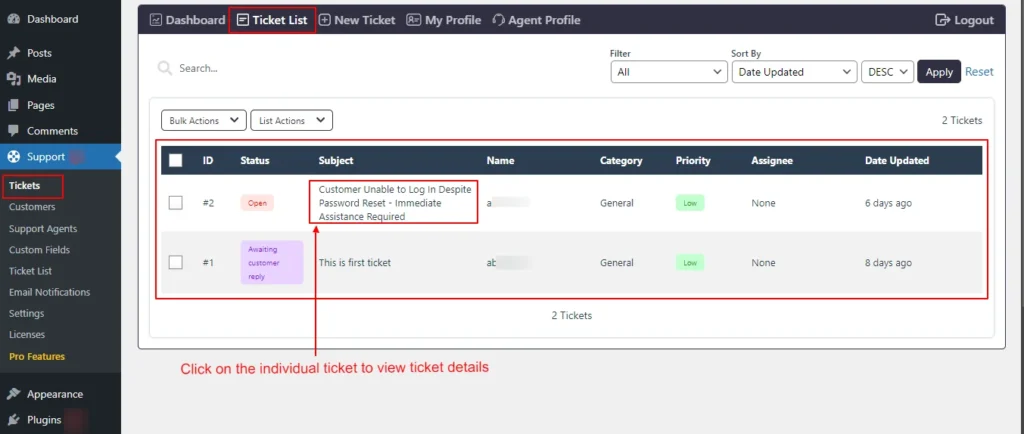
Screenshot 5: Ticket List
- Click on an individual ticket to view the ticket details, such as ticket status, ticket info, and comments, as shown in the below screenshot 6.
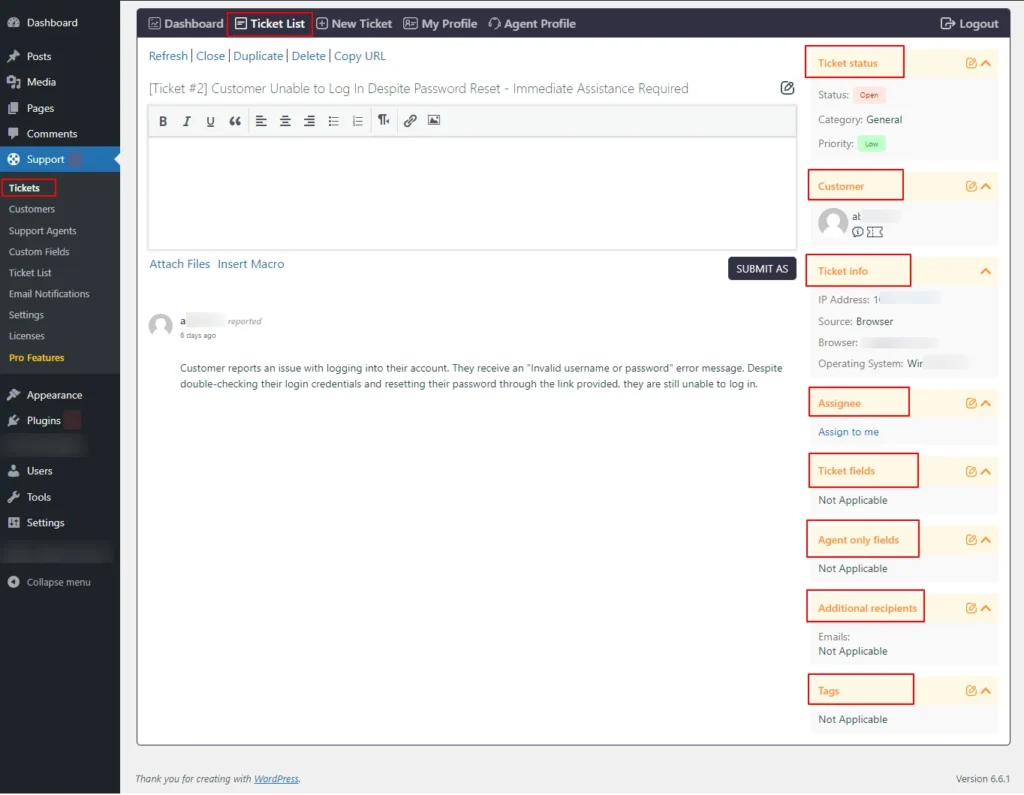
Screenshot 6: View single ticket details
Step 4: Viewing Dashboard
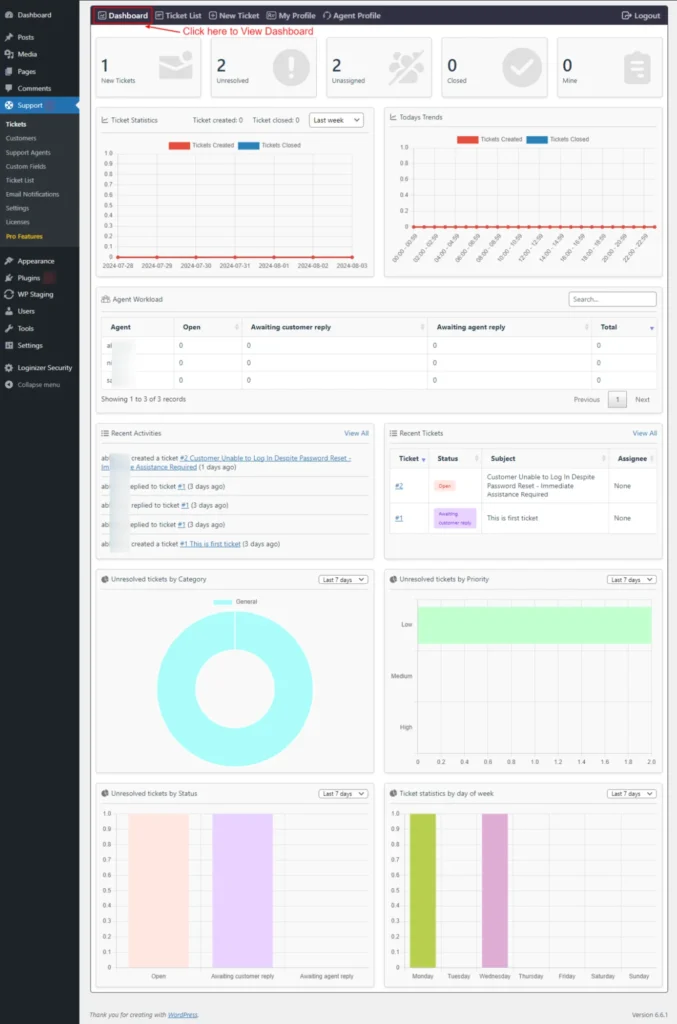
Screenshot 7: Dashboard
- At the top of the dashboard, we can see numbers of New, Unresolved, Unassigned, and Closed Tickets.
- Below that we can see various cards, such as
- Ticket Statistics
- Today’s Trends
- Agent Workload
- Recent Activities
- Recent Tickets
- Unresolved tickets by Category, Priority, and Status (default: last 7 days data)
- Ticket statistics by day of the week
- You can choose which cards to display in this dashboard under the settings menu, which is discussed in the default tab under Agent Profile.
Step 5: Adding a New Ticket
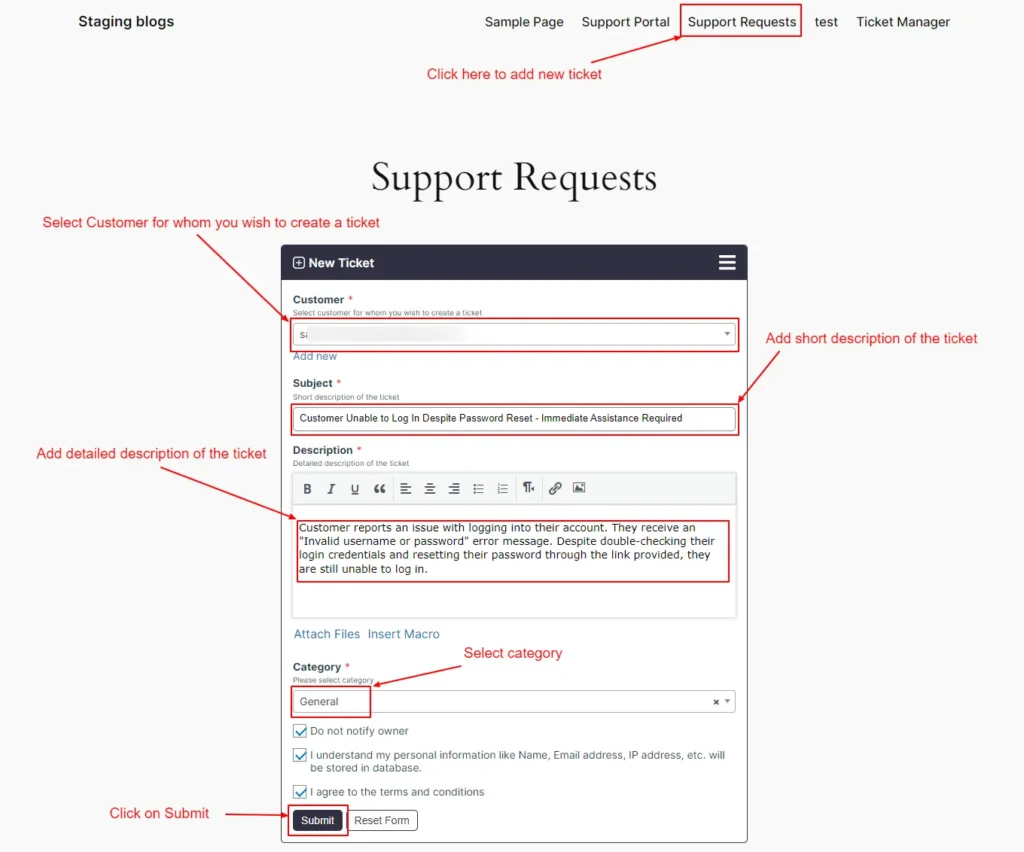
Adding a New Ticket from Frontend
- Your customers can add a ticket from the front end.
- Go to the Support Requests page that we created in Step 2.
- Click on the hamburger menu on the right side of the ticket list.
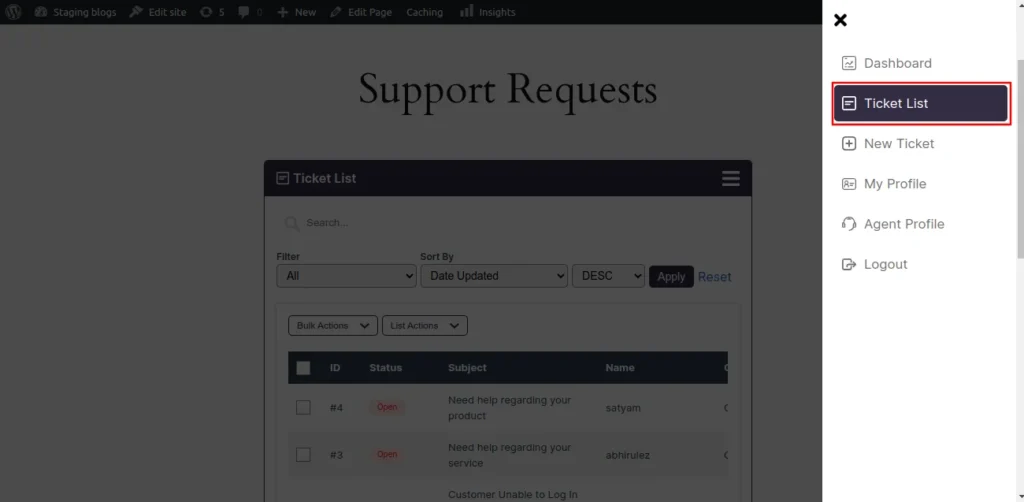
Screenshot 8: Slideover
- Click on New ticket.
- Add a subject or short description of the ticket.
- Add a detailed description of the ticket.
- Select the category.
- Agree to all terms and conditions.
- Click on Submit.
Screenshot 9: Adding a New Ticket from the Frontend
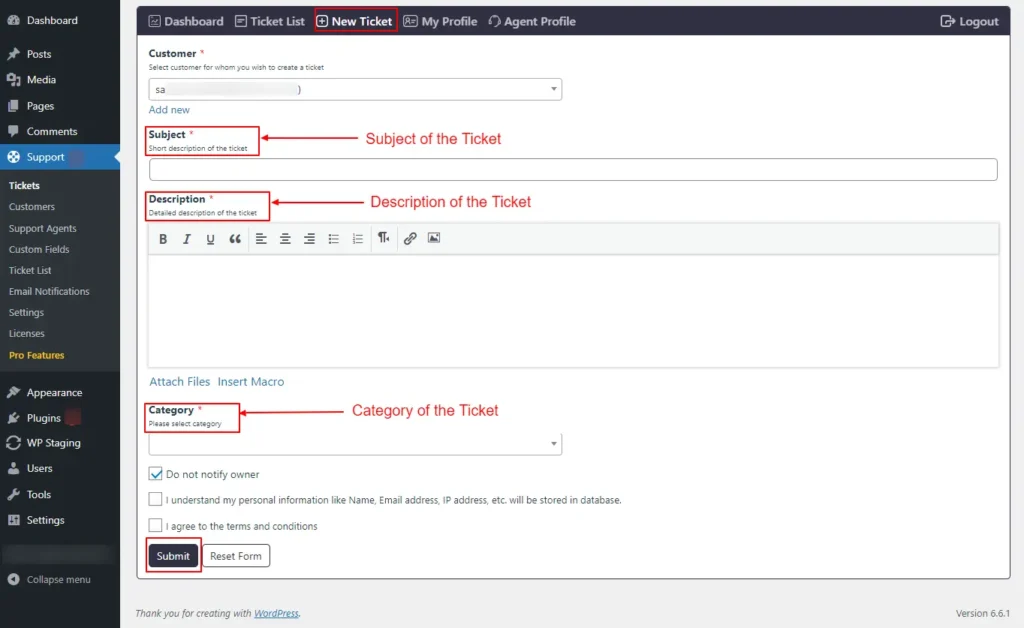
Adding a New Ticket from the backend
- In some situations, Support agents need to create tickets. Agents can add tickets from their accounts using this screen.
- Click on Support → Tickets.
- Click the New Ticket tab.
- In the Customer section, select the customer for whom you wish to create a ticket.
- Add a subject or short description of the ticket.
- Add a detailed description of the ticket.
- Select the category.
- Agree to the terms and conditions and click submit to save details.
Screenshot 10: Adding a New Ticket from the Backend
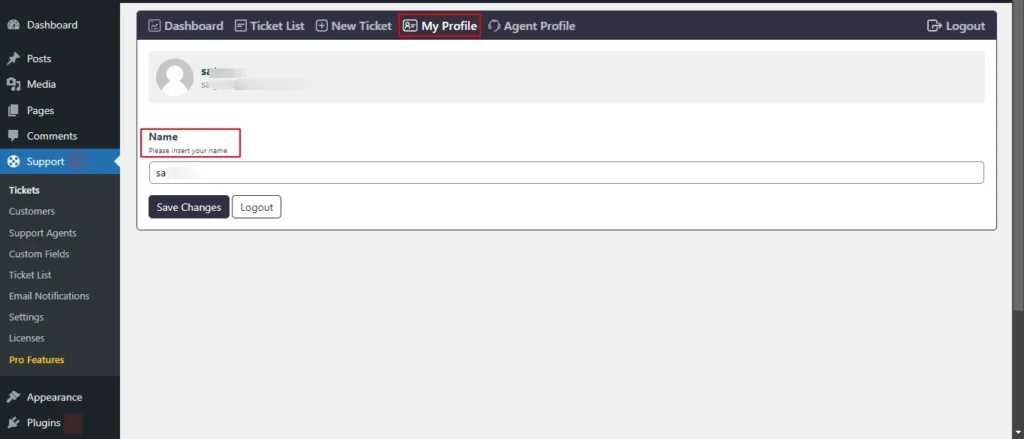
Step 6: My Profile
- Since we have already logged in as administrators, we can view our profile.
- If you want to update your name, you can do it on the My Profile screen.
- Hit Save Changes to save your name.
Screenshot 11: My Profile
Step 7: Agent Profile
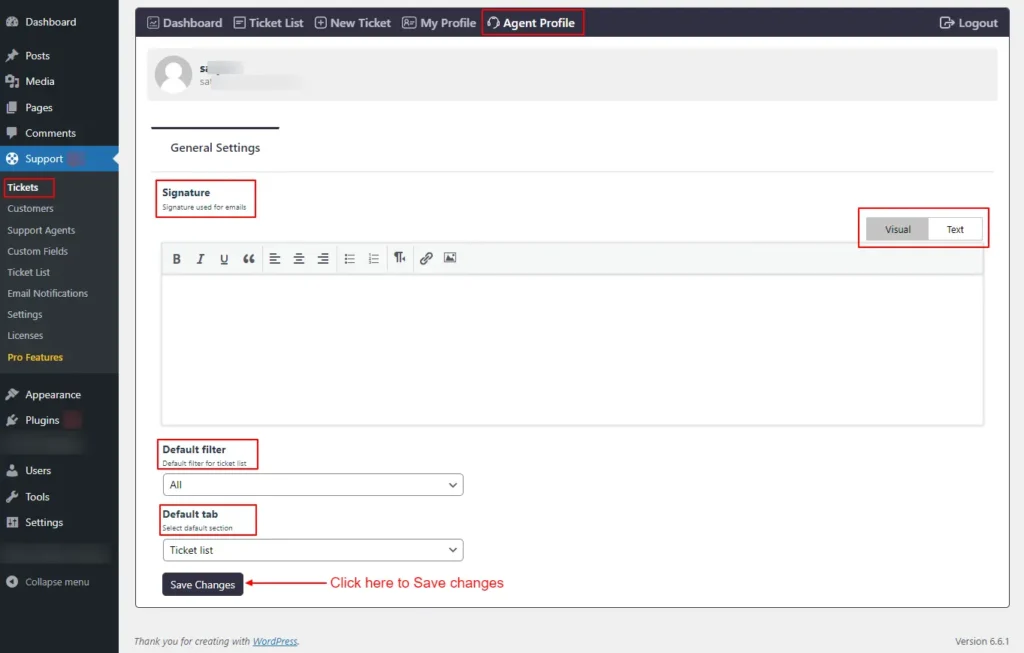
Screenshot 12: Agent Profile
- You can set the signature used for emails using the screen.
- Default filters on the Ticket List tab can be set from here. You can choose from Unresolved, Unassigned, Mine, Closed, and Deleted tickets.
- The default tab for the Support main menu can be set from here. You can choose from the available options Ticket List, Dashboard, and New Ticket.
Customers
Step 8: Managing Customers
- Go to the SupportCandy plugin menu.
- Click on the Customers, submenu.
- Here you will see a list of all registered customers.
- You can select between All Users or Users who have tickets to filter the customer list.
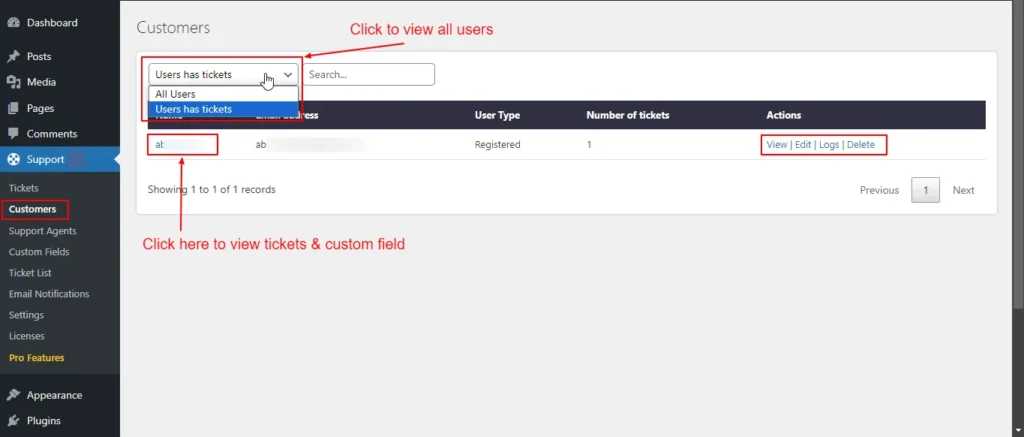
Screenshot 13: Filter Customers
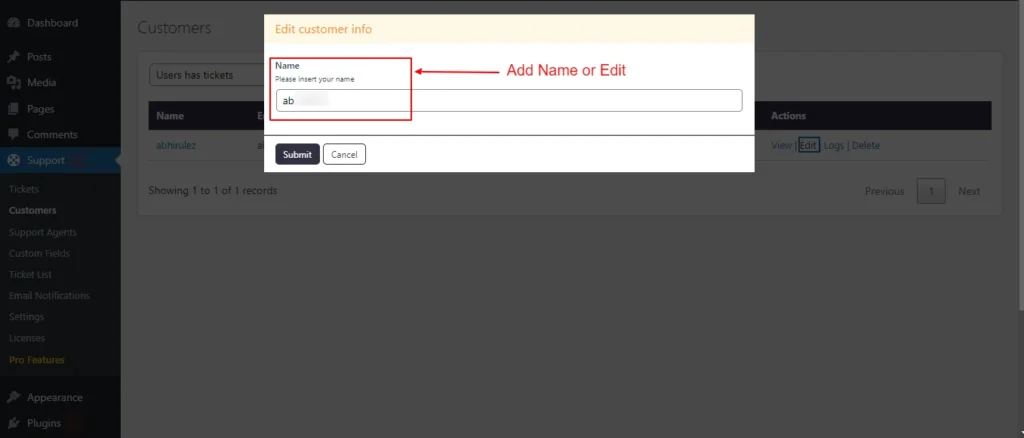
Screenshot 14: Edit Customer Info
- You can edit the customer information by clicking the edit button or view it by clicking the view button.
- When you click on the customer name, it will take you to his ticket list, as shown in the screenshot 15. There are 3 subtabs. Tickets, Custom Fields, Other.
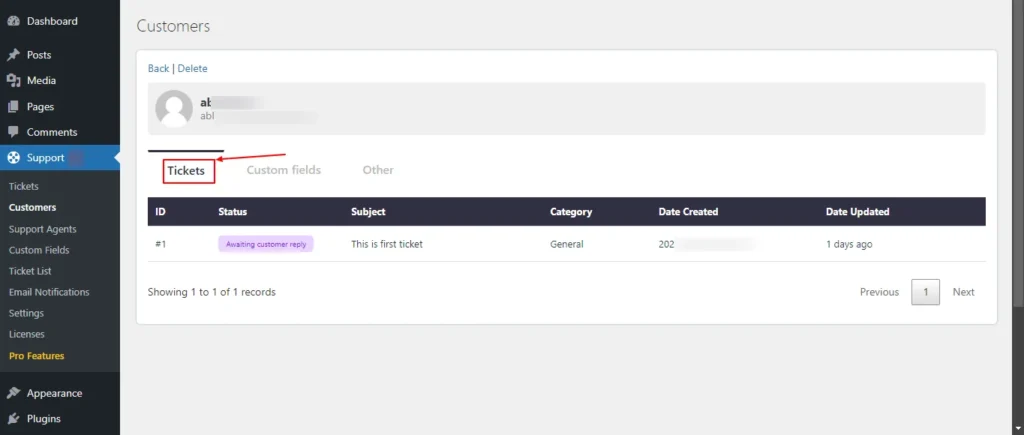
Screenshot 15: Customers → Tickets
- The Tickets tab shows all the tickets of a particular customer.
- Other tabs shows Recent Activities related to that customer.
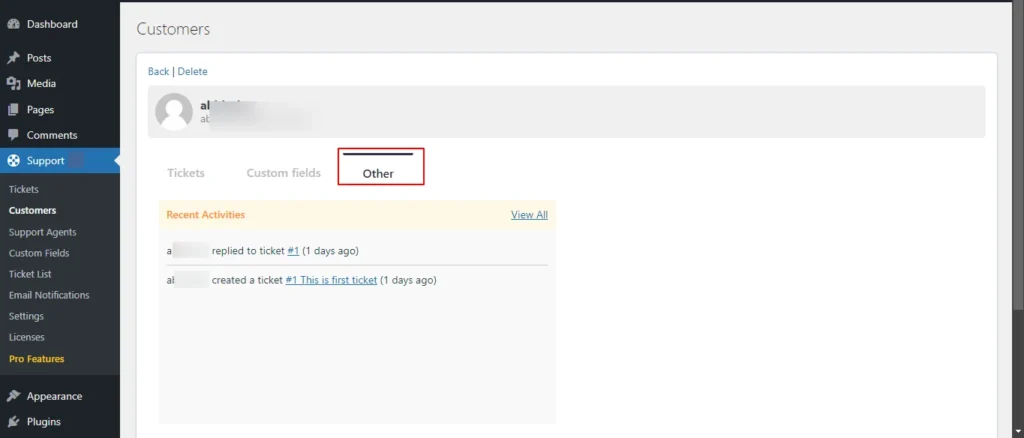
Screenshot 16: Customers Recent Activities
Support Agents
Step 9: Managing Agents
Adding a New Agent
- First, there should be a WordPress user account for the person to whom you wish to add an agent.
- Go to the SupportCandy plugin menu.
- Click on Support Agents.
- You can see all the agent lists in the screenshot 17.
- Click on Add New Agent.
- Search for the name from the list of WordPress users, for which you want to add as an agent.
- Select Role (Administrator, Agent, Editor, etc.)
- Click Submit.
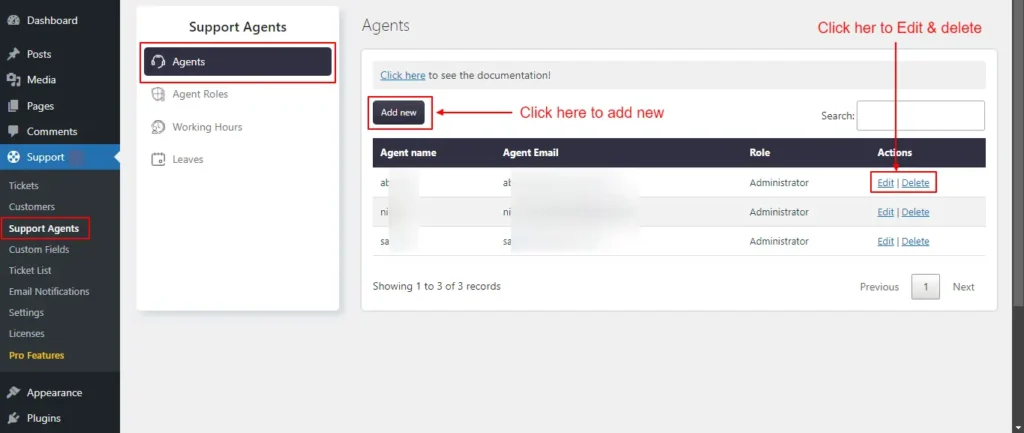
Screenshot 17: Agent List

Screenshot 18: Adding a new Agent
- You can also edit the agent role from the edit link or delete an agent using the delete link.
- The Edit link allows update roles (Administrator, Agent, Editor, or any custom role that you have added).
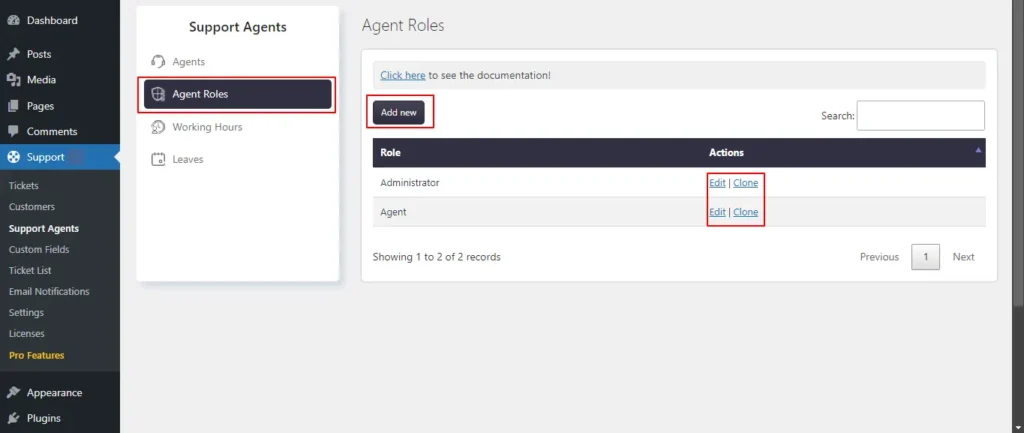
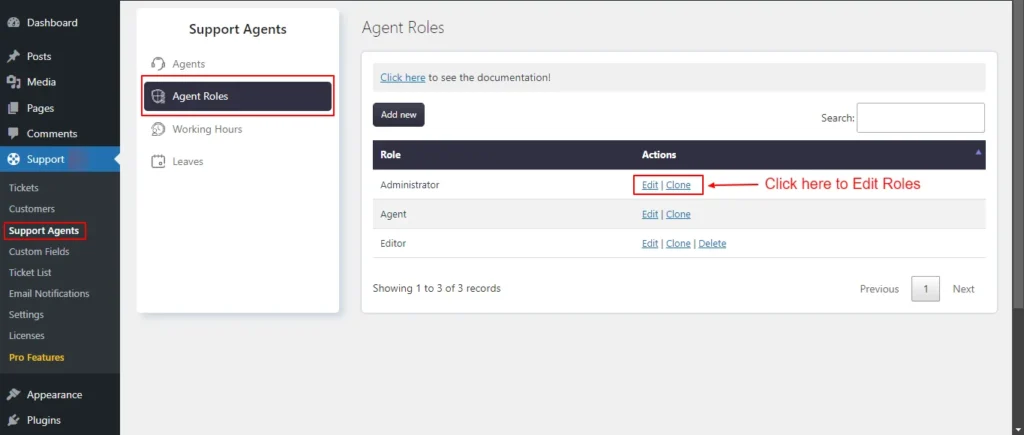
Step 10: Agent Roles
You can create an agent role and set its capabilities on this screen. By default, there are two roles, as follows:
- Administrator: Has all possible capabilities.
- Agent has limited capabilities.
Screenshot 19: Agent Roles List
Adding a New Role
Screenshot 20: Assign agent capabilities
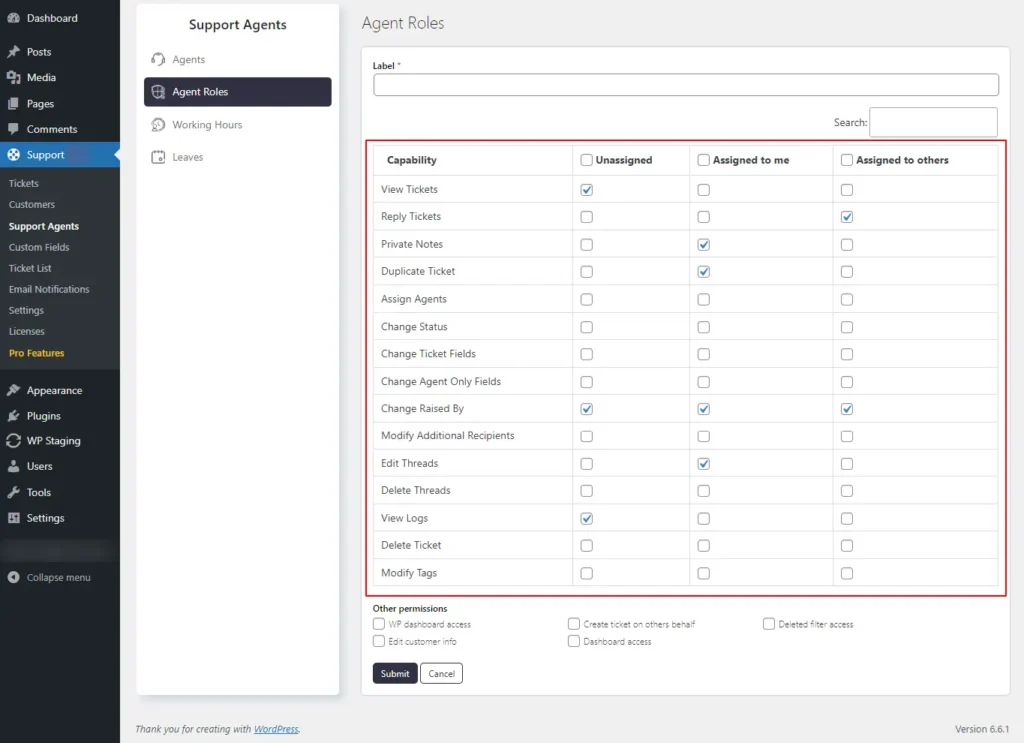
- Click on Add New Role.
- Specify the role name (label).
- You can grant permission for the following tickets:
- Unassigned: Tickets that have not been assigned to any agent or agent group.
- Assigned to me: Tickets that are specifically assigned to the current agent.
- Assigned to others: Tickets that are assigned to agents other than the current agent, but are not unassigned
- A few of the capabilities (actions that agents can perform)
- View Tickets: Controls read permission for applicable tickets. Agents who create tickets have read permission by default.
- Reply Tickets: Controls reply permission for applicable tickets. Agents who create tickets can reply by default.
- Private Notes: Controls permission to submit or read private notes on applicable tickets.
- Assign Agents: Controls permission to assign agents to applicable tickets.
- Change Status: Controls permission to change the status, category, and priority of applicable tickets.
- Change Ticket Fields: Controls permission to update ticket fields for applicable tickets.
- Change Agent-only Fields: Controls permission to update agent-only fields for applicable tickets.
- Change Raised By: Controls permission to update the ticket owner/creator for applicable tickets.
- Modify Additional Recipients: Controls permission to update additional recipients of applicable tickets. Ticket creators always have this capability.
- Edit Thread: Controls permission to edit/update threads of applicable tickets.
- Delete Thread: Controls permission to delete threads of applicable tickets.
- View Logs: Controls permission to view logs of applicable tickets.
- Delete Ticket: Controls permission to delete or restore applicable tickets.
- Here are additional permissions beyond ticket management:
- WP Dashboard Access: Grants an agent access to the WordPress dashboard. Without this, the agent can only view tickets from the front end, not the dashboard.
- Create Ticket on Others’ Behalf: Allows an agent to create tickets on behalf of others.
- Deleted Filter Access: Allows agents to access the Deleted filter on the ticket list, enabling them to view deleted tickets. Without this, deleted tickets cannot be accessed.
- Edit Customer Info: Permits an agent to update customer information within individual tickets.
- Click Submit to save the new role.
Editing an Agent Role
Screenshot 21: Edit Agent Roles
- Under the Support Agents tab, click on Agent Roles.
- Select a role and click Edit.
- Make the necessary changes.
- Click Save.
- You cannot delete Administrator and Agent roles as these are the default roles.

Screenshot 22: Edit roles and permissions
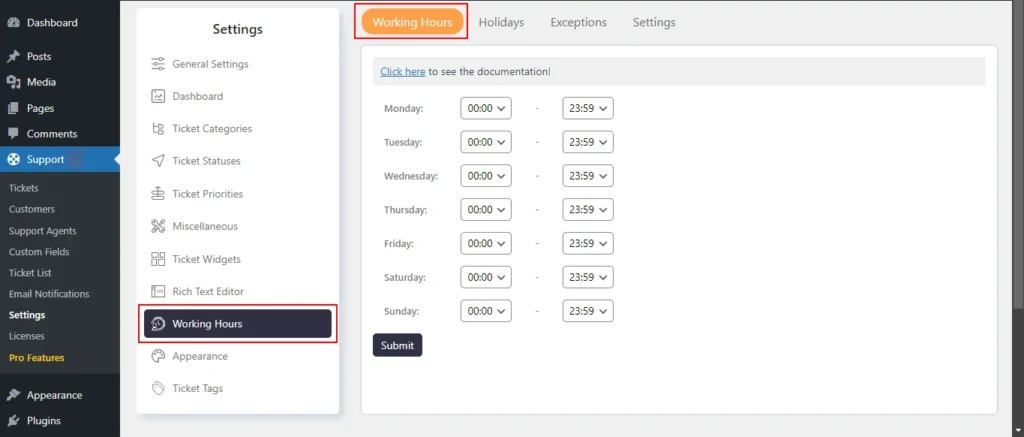
Step 11: Working Hours
Configuring Working Hours
- Go to the Support Agents → Working Hours tab.
- Select the agent from the dropdown and then set the working hours.
- Click Submit.
Screenshot 23: Working hours
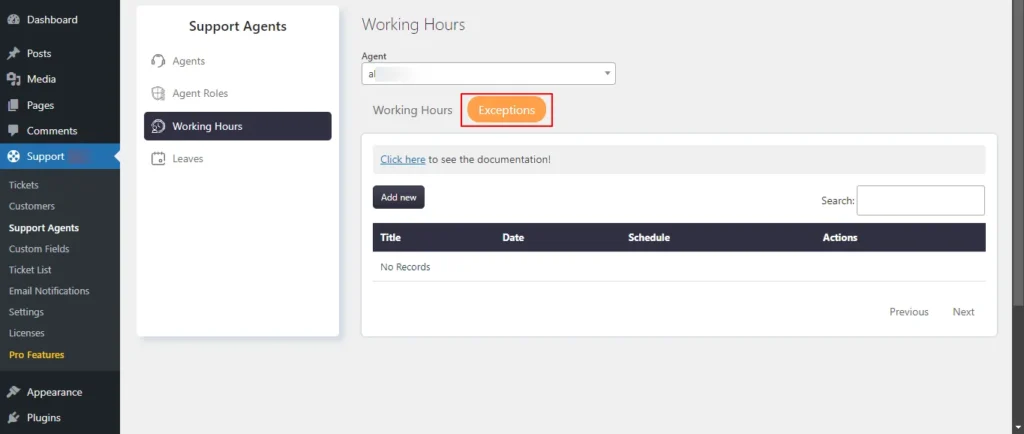
Working Hours Exceptions
- Exceptions allow for adjustments to standard working hours on specific dates. For example, if your typical working hours on a Monday are from 9:00 a.m. to 6:00 p.m. but you need to work from 9:00 a.m. to 2:00 p.m. on a particular Monday, you can set an exception to reflect this change.
- The system will then prioritize these modified hours over the usual schedule.
Screenshot 24: Exceptions
- Click on Exceptions.
- Add Title, Date, and Schedule
- Click Submit.
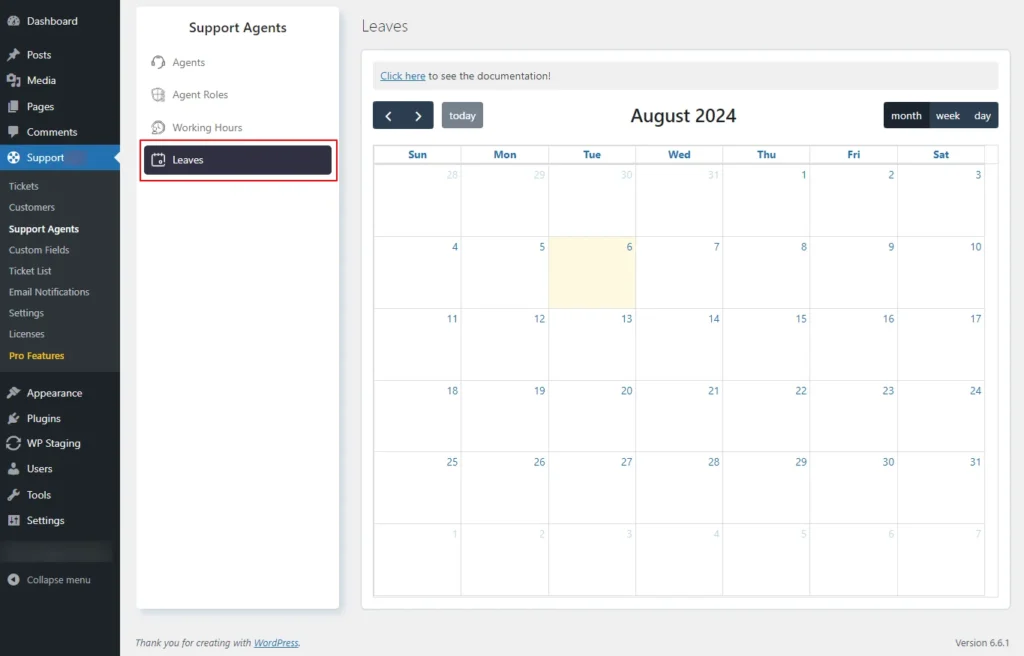
Step 12: Leaves
- You can set leaves or day-offs for the agents.
Screenshot 25: Leaves Calendar
- Click on the date for which you want to add leaves. Search for the agent name for which you want to grant leave and click submit.
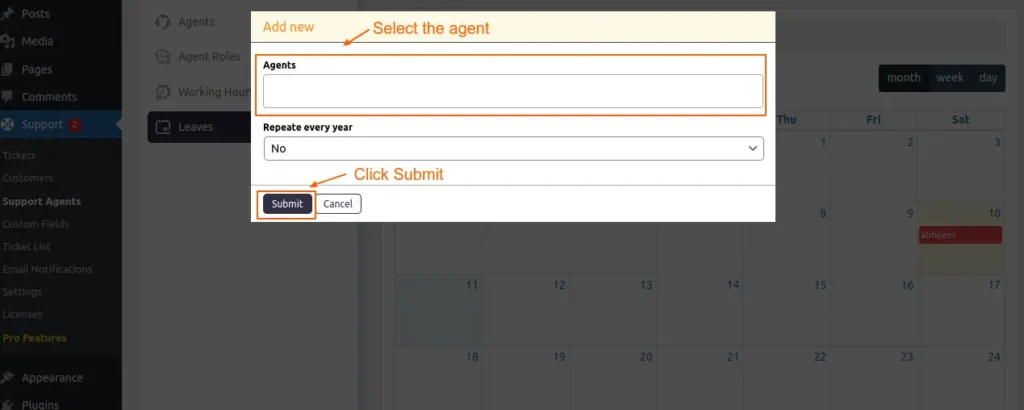
Screenshot 26: Add leaves
Custom Fields
Step 13: Ticket Form Fields
- The Ticket Form Fields are the fields that are displayed on ticket form. This section lets you add or remove fields from the submit ticket form.
- If you want to add new fields to this form, Go to Support → Custom Fields → Ticket Fields, which is discussed next.
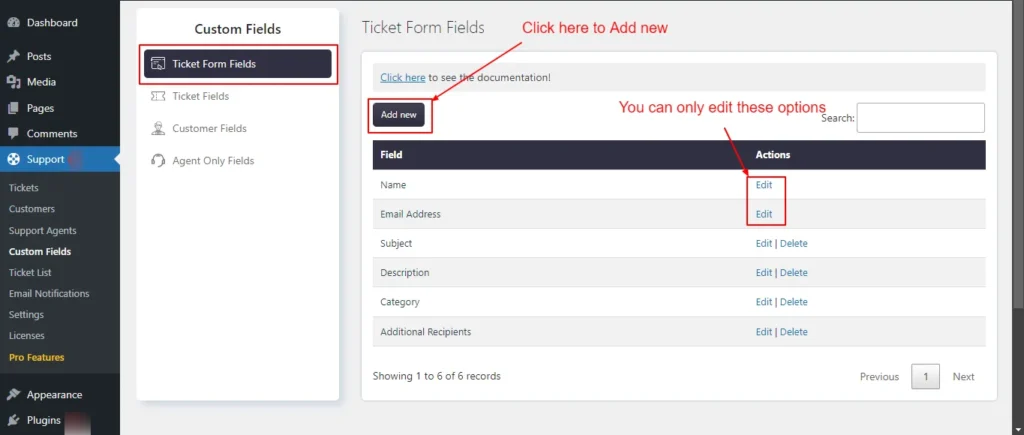
Screenshot 27: Ticket Form fields list
Add a field to the Ticket form fields
- Using Ticket Fields, Customer Fields, and Agent Only Fields you can add new fields to a ticket submission form.
- Ticket Fields: These are fields to collect more information from the customer (ticket subject, ticket description).
- Customer Fields: Fields to collect information about the customer. Name and email are default.
- Agent Only Fields: You can add fields specific to an agent.
Screenshot 28: Add a new field to the Ticket form
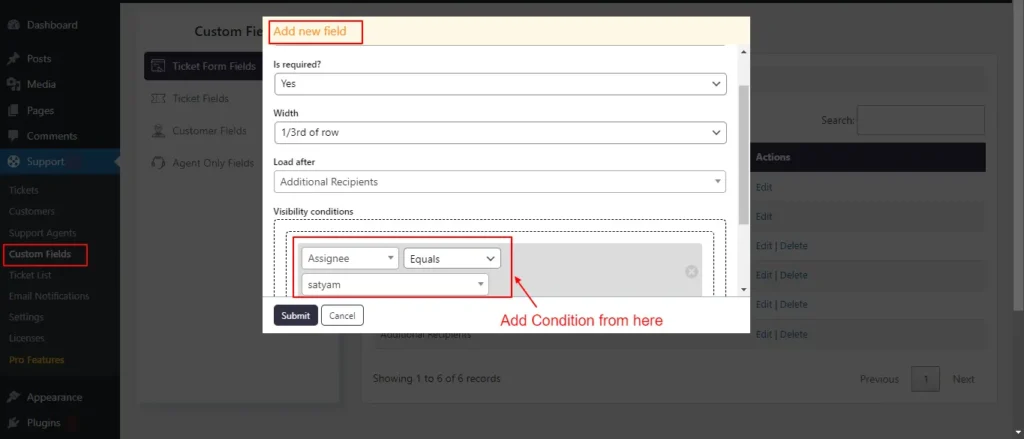
- The Add New Field screen has the following settings to be configured
- Select field: You can choose which fields from the ticket fields and user fields you want to add.
- Is required: Deciding whether the selected field is essential is up to you. If a field is marked as mandatory, it must be completed before submitting the report.
- Width: Within the form, it’s possible to adjust the width of the area. There are three choices available: one-third of the row, half the width of the row, and the entire width of the row.
- Load after: This choice lets you change the order of the fields.
- Visibility conditions: The selected field can be displayed only when a specific situation is met. The fields will remain hidden as long as the conditions are not met. Conditions can be set using both AND logic (where all conditions must be met) and OR logic (where at least one condition must be met).
Editing Ticket Form Fields
- Go to the Support menu.
- Click Custom Fields → Ticket Form Fields.
- Click the Edit button next to a field you want to change to make changes.
- Click Submit.
- The name and email address fields are default; hence, you can only change the Width and Load after settings. Also, you can’t delete them.
- For the rest of the fields, you can edit and delete them.
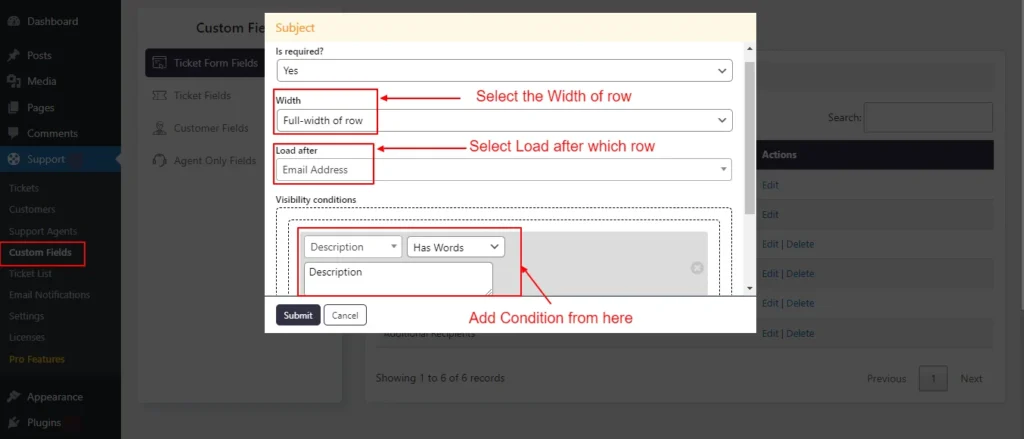
Screenshot 29: Editing the Subject Field
Step 14: Ticket Fields
- From the Ticket fields screen, you can create new fields to collect more information about tickets which can then be added to the New Ticket form.
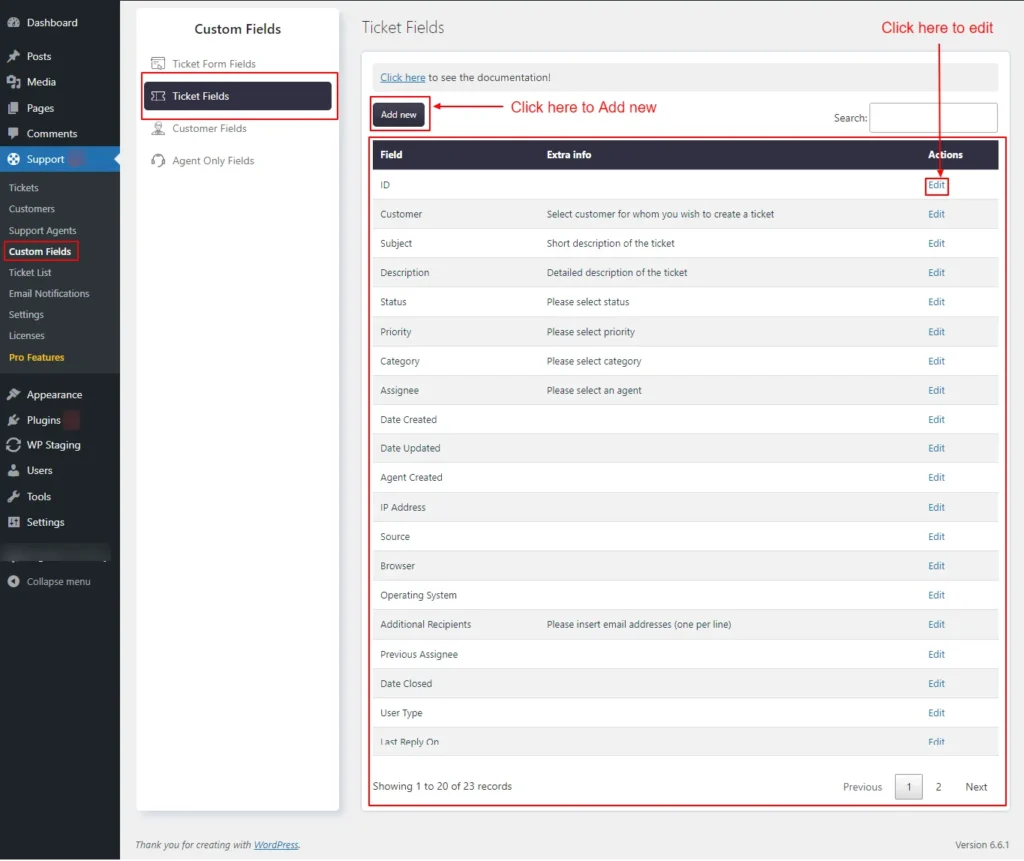
Screenshot 30: Ticket fields
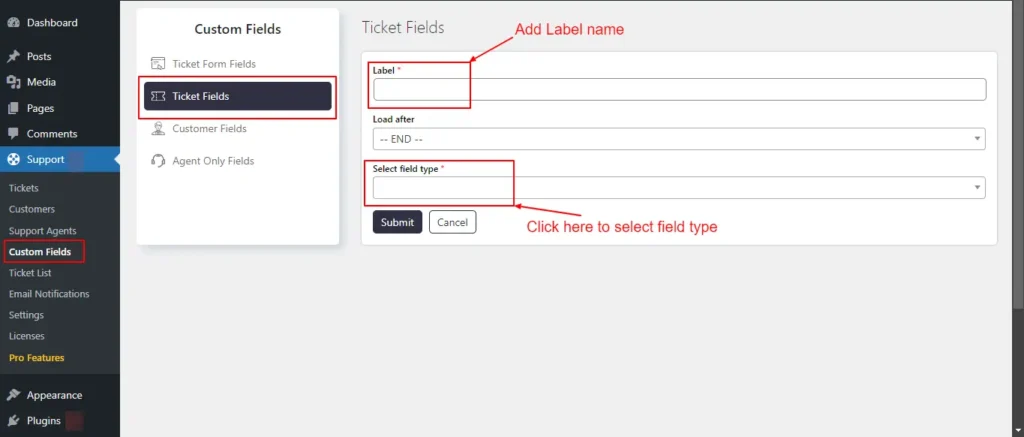
Adding New Ticket Fields
- Click Add New to create a new ticket field.
- Enter the label.
- Choose where will be this field loaded after.
- Choose the field type (e.g., text, dropdown, checkbox). Based on the field type, it will show more configuration options, such as Extra Info, Default Value, Auto-fill in ticket form, Character limit, Placeholder, Has personal info etc.
- Click Submit.
Screenshot 31: Adding New Ticket fields in the custom field
Editing Existing Ticket Fields
- Click Edit to edit a ticket field.
- Edit the field details such as Label, Subject, Load after, Extra info, Short description of the ticket, Default value, Not Applicable, Auto-fill in ticket form, Character limit, Placeholder, Ticket list width (pixels), etc.
- Once done Click Submit.

Screenshot 32: Editing Ticket fields in Custom fields
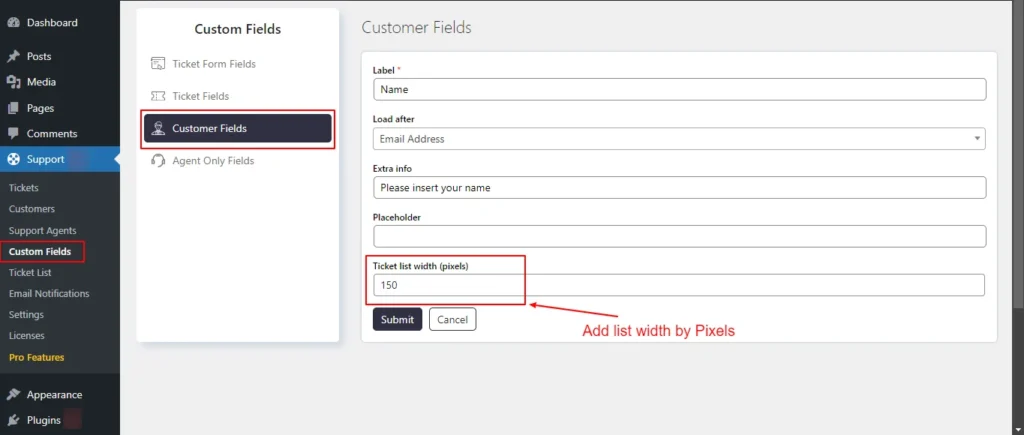
Step 15: Customer Fields
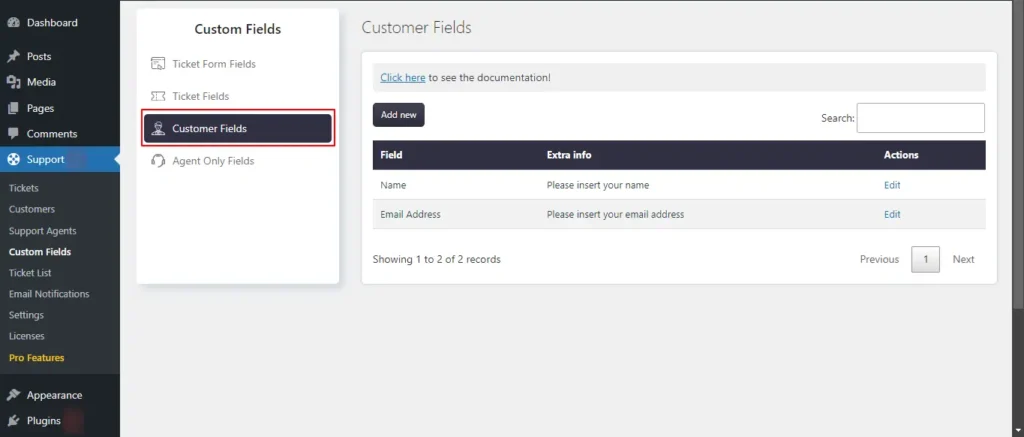
Screenshot 33: Customer Fields list
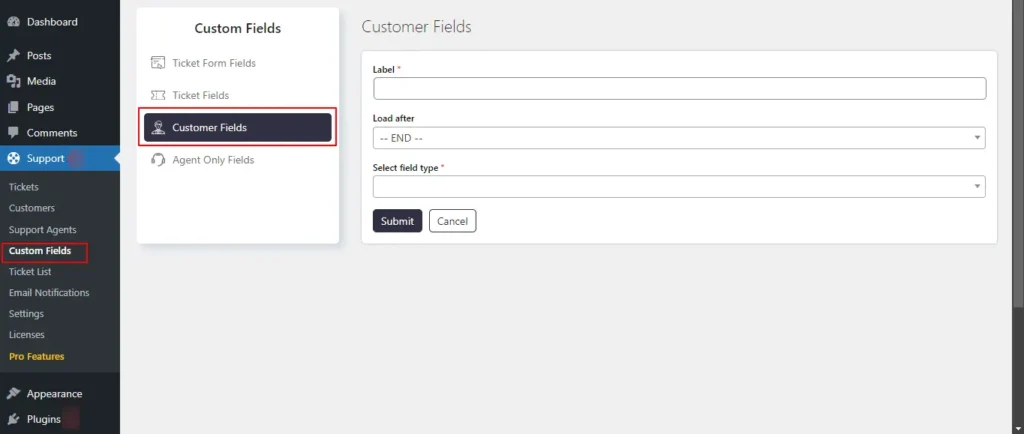
Adding New Customer Fields
- Click on the Add New button to create a new customer field.
- Choose the field type (e.g., text, dropdown, checkbox). Based on the field type, it will show more configuration options, such as Extra Info, Default Value, Auto-fill in ticket form, Character limit, Placeholder, Has personal info, Allow in my profile and Allow in ticket form, etc.
- Click Submit.
Screenshot 34: Adding New Customer Fields
Editing Customer Fields
- Click on Customer Fields.
- To edit an existing field, click on the Edit button next to the field.
- Make the necessary changes to the field settings.
- Click Submit.
Screenshot 35: Editing Customer Fields
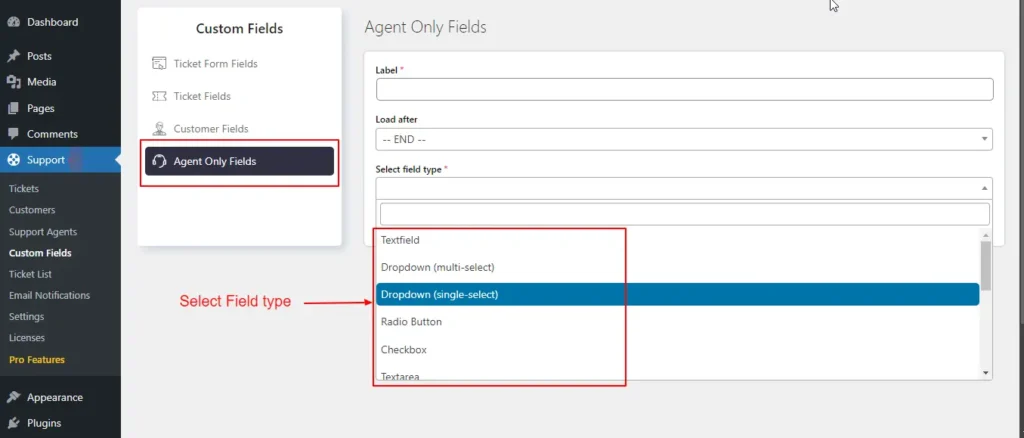
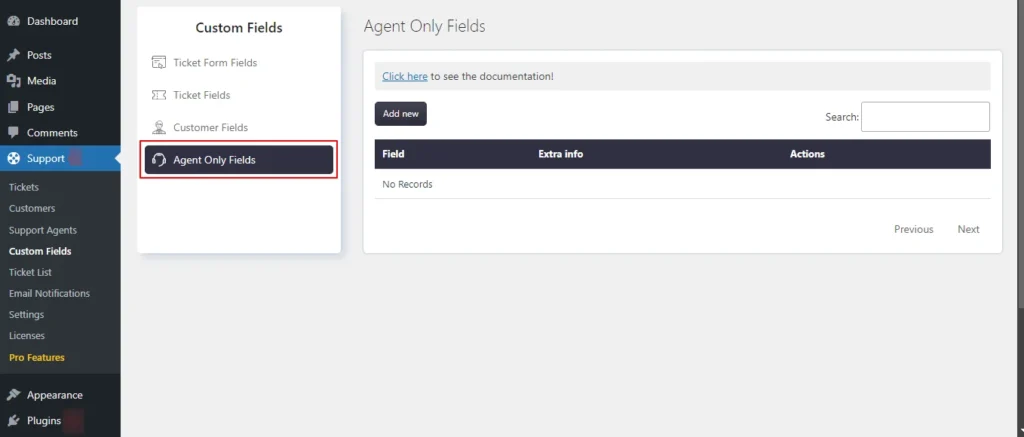
Step 16: Agent Only Fields
- Ticket fields and agent-only fields are essentially identical, with the sole distinction being that the latter is not viewable by customers.
- If agent-only fields are included in the customer ticket list items, customers have the ability to view them in the ticket list.
Adding New Agent-Only Fields
- Click Add New to create a new agent-only field.
- Choose the field type (e.g., text, dropdown, checkbox).
- Configure the field settings (Extra info, Default value, Character limit, Placeholder, Ticket list width, Has personal info etc.)
- Click Submit.
Screenshot 36: Adding New Agent Only Fields
Editing Agent Only Fields
- Go to the SupportCandy plugin menu.
- Click on Agent Only Fields.
- To edit an existing field, click on the Edit button next to the field.
- Make the necessary changes to the field settings.
- Click Submit.
Screenshot 37: Editing Agent Only Fields
Conclusion
In this blog (Part 1 of 3 of the series), we walked you through how to add a helpdesk and ticket system on WordPress using the SupportCandy plugin.
SupportCandy adds to your WordPress site the features of a complete help desk and customer support ticket system. It is one of WordPress’s most popular helpdesk and customer support ticketing plugins.
That’s it for this article.
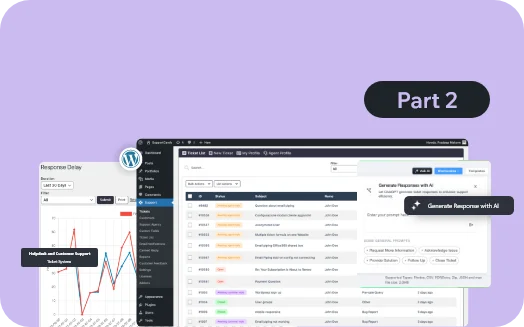
In Part 2 of this series, we will dive deeper into other sections of SupportCandy.
If you need any help related to WordPress, please contact our WordPress experts.
Build
Website
Themes